 Skip to content
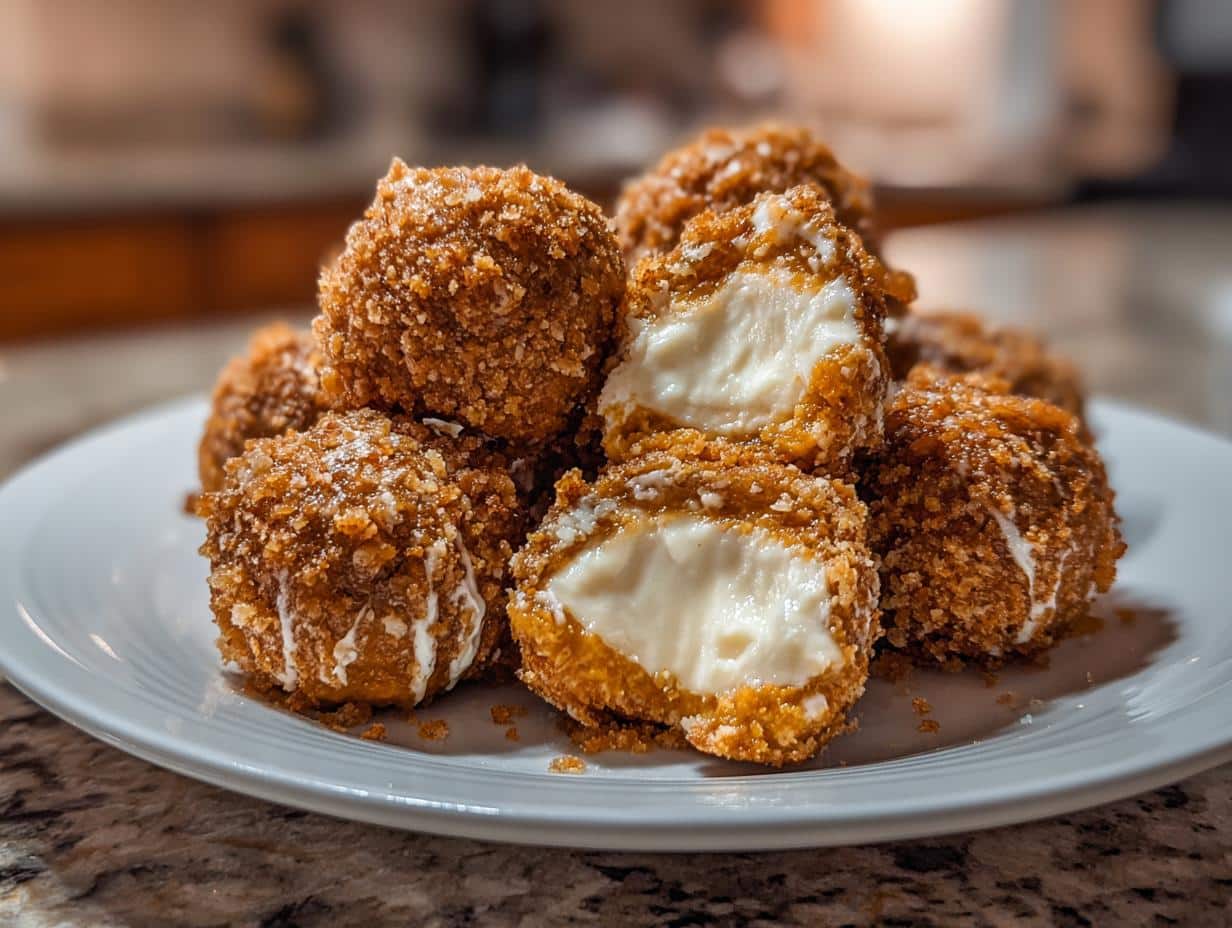
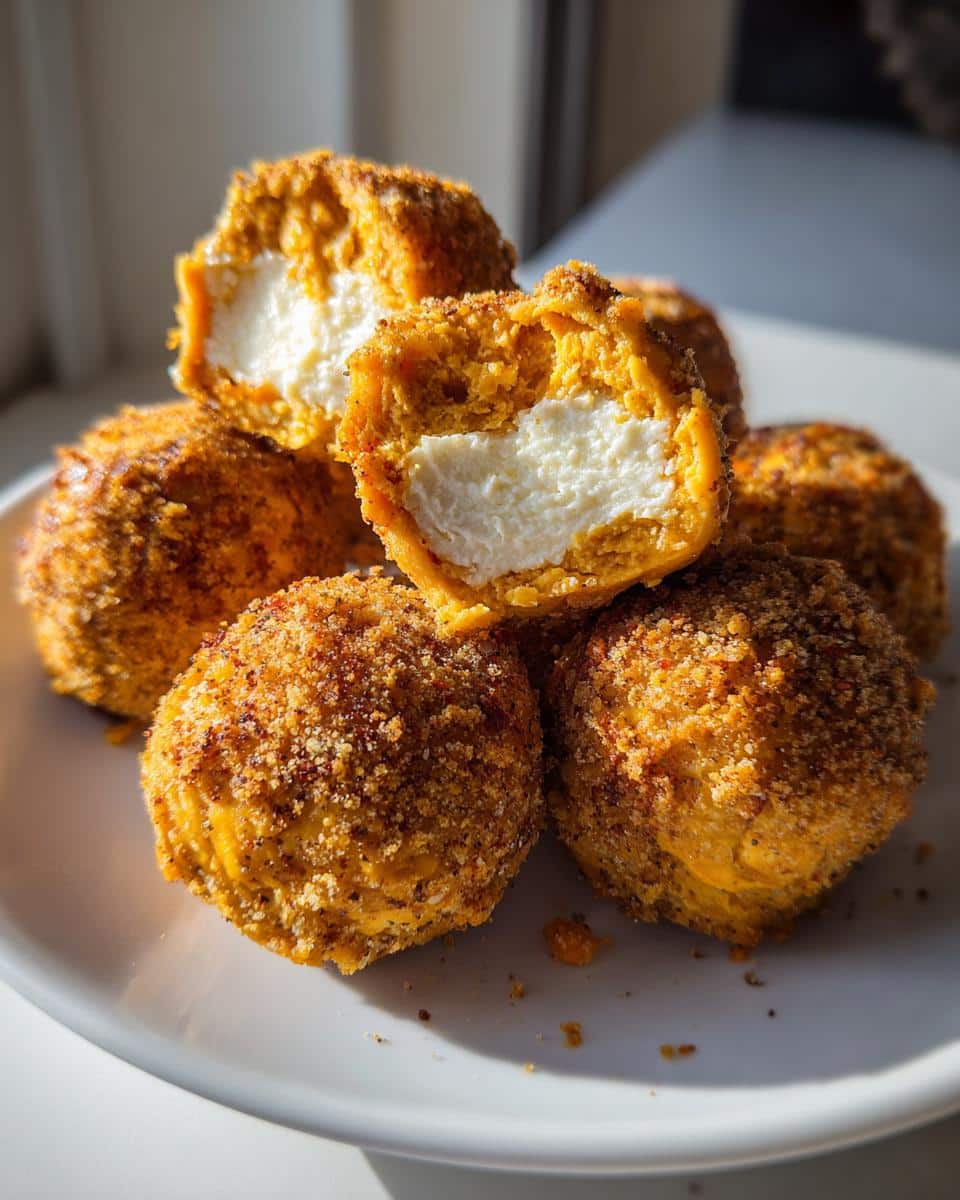
Okay, okay, hear me out! I’m Riley, and I’m *obsessed* with all things pumpkin spice. But sometimes, y’know, you just don’t wanna bake. That’s where these ridiculously easy No Bake Pumpkin Cheesecake Balls come in. Seriously, they’re about to become your new go-to fall treat. Think creamy, dreamy cheesecake filling packed with all that warm pumpkin spice flavor, rolled into a crunchy graham cracker coating.
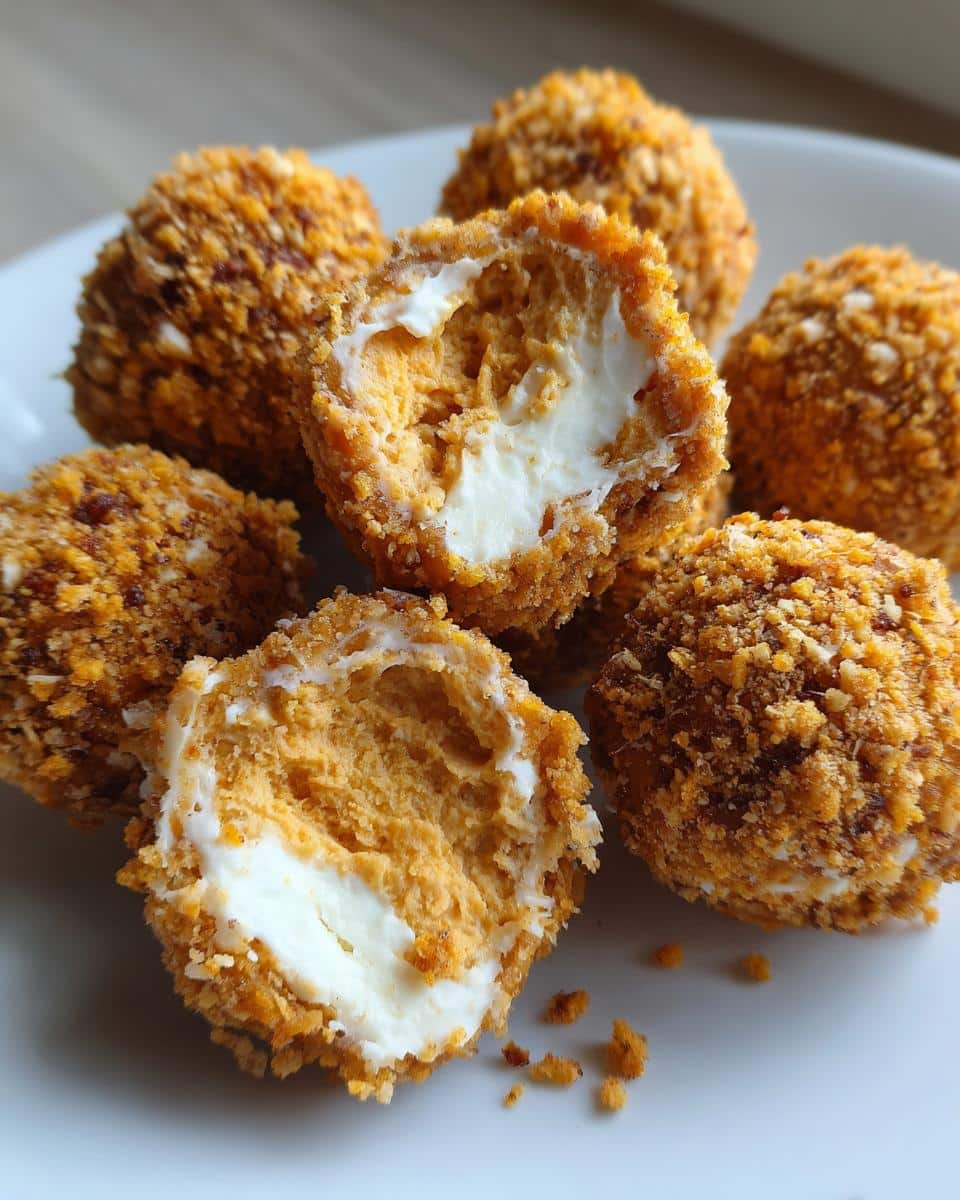
My granny, bless her heart, would probably raise an eyebrow at anything “no-bake.” She was all about the traditional methods. But even she couldn’t resist a quick dessert when company popped over! And trust me, these are perfect for those last-minute cravings or when you need a show-stopping dessert without breaking a sweat. Plus, they’re so cute – total Pinterest-worthy material, if I do say so myself! I’ve been tweaking this recipe for ages, and I think I’ve finally nailed the perfect balance of flavors and textures. Get ready to fall in love with the easiest, most delicious pumpkin dessert *ever*!
Why You’ll Love These No Bake Pumpkin Cheesecake Balls
Quick and Easy No Bake Pumpkin Cheesecake Balls
Seriously, these are SO quick! I’m talking minimal prep time. Mix a few ingredients, chill, roll, and BAM! Dessert is served. Don’t worry if you’re not a pro baker; this recipe is practically foolproof.
The Perfect Fall Dessert: No Bake Pumpkin Cheesecake Balls
Hello, pumpkin spice season! These little guys are bursting with warm, cozy flavors. They’re the perfect way to celebrate fall, and they look absolutely adorable on any dessert table. My favorite part is that they are so easy to customize!
No-Bake Convenience for Pumpkin Cheesecake Balls
Skip the oven and still impress! During the busy holidays, who has time to bake? These no bake pumpkin cheesecake balls are the answer. They’re a lifesaver when you need a delicious dessert without the fuss. And the best part? No risk of burning anything!
Ingredients for No Bake Pumpkin Cheesecake Balls
Alright, let’s gather our goodies! This is the fun part. Here’s what you’ll need to whip up a batch of these dreamy no bake pumpkin cheesecake balls. Don’t skimp on the good stuff, okay? The better the ingredients, the tastier these little bites of heaven will be! I promise it is worth it!
Cream Cheese
You absolutely HAVE to use full-fat cream cheese here, friends. And make sure it’s properly softened to room temperature. Trust me, it makes all the difference in the world for that smooth, creamy texture. We’re talking about two 8-ounce packages.
Pumpkin Puree
Now, this is important: grab a can of 100% pumpkin puree, *not* pumpkin pie filling. They’re totally different! Pumpkin pie filling already has spices and sugar added, and we want to control the flavor ourselves. One 15-ounce can should do the trick.
Graham Cracker Crumbs
You’ll need about 1 1/2 cups of finely crushed graham crackers. You can buy them pre-crushed (lazy baker’s secret!), or crush them yourself in a food processor or zip-top bag. About 15 full sheets should be enough.
Powdered Sugar
For the smoothest texture, use sifted powdered sugar. Nobody wants lumpy cheesecake balls! You’ll need about 2 cups. Sifting it gets rid of any clumps, so it blends perfectly into the cream cheese mixture.
Pumpkin Pie Spice
Ah, the magic ingredient! You can use a pre-mixed pumpkin pie spice blend, or make your own. I usually throw in about 2 teaspoons, but feel free to adjust to your taste. More is more, right?
Melted Butter
Unsalted butter is best here, melted and slightly cooled. You don’t want it to be too hot, or it will mess with the graham cracker crust. About 6 tablespoons should do it.
Optional Coatings for No Bake Pumpkin Cheesecake Balls
This is where you get to be creative! Some of my favorites include chopped pecans or walnuts, mini chocolate shavings, festive sprinkles, or even a dusting of cocoa powder. Go wild!
How to Prepare No Bake Pumpkin Cheesecake Balls
Okay, let’s get down to business! These no bake pumpkin cheesecake balls are so easy to make, you’ll be snacking on them in no time. Just follow these simple steps, and you’ll be golden! Don’t worry if it seems like a lot of steps – I promise, it’s mostly just waiting for things to chill. Which, let’s be honest, is the hardest part!
Making the Graham Cracker Crust for Pumpkin Cheesecake Balls
First, grab a medium bowl and dump in your graham cracker crumbs. Pour that melted butter over the crumbs and mix it all up until it’s evenly moistened. It should look like wet sand. Now, you *could* press this mixture into the bottom of a pan if you wanted to make a cheesecake bar situation, but we’re going for balls today, so just set it aside for rolling later. Easy peasy!
Preparing the Pumpkin Cheesecake Filling for No Bake Pumpkin Cheesecake Balls
In a large bowl (or the bowl of your stand mixer), beat that softened cream cheese until it’s nice and smooth. Seriously, make sure there are no lumps! Add the pumpkin puree, sifted powdered sugar, and pumpkin pie spice. Beat it all together until it’s smooth and creamy. Don’t overmix, though, or it can get a little weird. Just until everything is nicely combined. Give it a taste – yum!
Chilling and Forming the No Bake Pumpkin Cheesecake Balls
Now comes the patience part. Cover that bowl of pumpkin cheesecake filling with plastic wrap and pop it into the fridge. It needs to chill for at least 2 hours, but longer is even better. This is super important because it firms up the mixture so you can actually roll it into balls. Trust me, if you skip this step, you’ll have a sticky mess on your hands! Once it’s nice and firm, use a spoon or small cookie scoop to scoop out portions and roll them into balls. I like mine to be about an inch in diameter.
Coating the No Bake Pumpkin Cheesecake Balls
This is where the fun begins! Pour your chosen coatings (chopped nuts, sprinkles, chocolate shavings, whatever your heart desires!) into separate shallow bowls. Roll each cheesecake ball in the coating until it’s completely covered. Get creative and have fun with it!
Final Chill and Serving Your No Bake Pumpkin Cheesecake Balls
Place the coated no bake pumpkin cheesecake balls on a plate or baking sheet lined with parchment paper and pop them back into the fridge for at least another 30 minutes. This helps the coating set and keeps the balls firm. When you’re ready to serve, just grab them and enjoy! These are seriously addictive, so be warned!
Tips for the Best No Bake Pumpkin Cheesecake Balls
Softening Cream Cheese for Smooth No Bake Pumpkin Cheesecake Balls
Listen, this is HUGE! Don’t even *think* about using cold cream cheese straight from the fridge. It’ll be lumpy and impossible to mix smoothly. Let it sit out at room temperature for at least an hour, maybe even two, until it’s nice and soft. You’ll thank me later!
Don’t Overmix the No Bake Pumpkin Cheesecake Balls Filling
I know it’s tempting to just keep mixing and mixing, but resist the urge! Overmixing can lead to a less creamy, almost rubbery texture. Just mix until everything is combined, and then stop. Trust me on this one. Less is more!
Chilling Time is Key for No Bake Pumpkin Cheesecake Balls
Seriously, don’t rush the chilling process! It’s absolutely essential for these no bake pumpkin cheesecake balls to firm up properly. If you try to roll them before they’re firm enough, you’ll end up with a sticky, frustrating mess. Be patient, my friend! It’s worth the wait.
Variations on Your No Bake Pumpkin Cheesecake Balls Recipe
Okay, so you’ve mastered the basic recipe? Awesome! Now, let’s get a little wild and try some fun variations. That’s what I love most! These no bake pumpkin cheesecake balls are like a blank canvas – ready for your creative touch! Don’t be afraid to experiment and make them your own.
Chocolate Covered No Bake Pumpkin Cheesecake Balls
Oh. My. Goodness. Melt some chocolate chips (milk, dark, or white – you choose!) in the microwave or over a double boiler. Dip those chilled cheesecake balls in the melted chocolate, let the excess drip off, and then sprinkle with some sea salt. Seriously, chocolate and pumpkin are a match made in heaven! Careful, it splatters a little!
Spiced No Bake Pumpkin Cheesecake Balls
Want to kick up the spice factor? Add an extra 1/2 teaspoon of cinnamon or nutmeg to the cheesecake filling. You could even throw in a pinch of cloves or ginger for a real warming kick. Just don’t go overboard, or it’ll be too intense! I love just a touch more cinnamon!
Nutty No Bake Pumpkin Cheesecake Balls
For some added crunch and flavor, roll those cheesecake balls in chopped pecans, walnuts, or even toasted almonds. Toasting the nuts first really brings out their flavor. Trust me, it makes a difference!
Serving Suggestions for No Bake Pumpkin Cheesecake Balls
Perfect for Holiday Parties: No Bake Pumpkin Cheesecake Balls
These little guys are *begging* to be on your holiday dessert platter! Arrange them artfully with other fall treats like mini pies, spiced cookies, and maybe some caramel apples. Watch them disappear!
Enjoy with Coffee or Tea: No Bake Pumpkin Cheesecake Balls
Seriously, is there anything better than a warm cup of coffee or tea and a sweet treat? These no bake pumpkin cheesecake balls are the perfect companion. The creamy, spiced flavor pairs beautifully with a hot drink. You’ll want to try this ASAP!
Storage & Reheating Instructions for No Bake Pumpkin Cheesecake Balls
Storing Your No Bake Pumpkin Cheesecake Balls
Okay, so you’ve managed *not* to eat them all in one sitting? Impressive! Just pop any leftover no bake pumpkin cheesecake balls into an airtight container and stash them in the fridge. They’ll stay fresh for about 3-4 days… if they last that long!
FAQ About No Bake Pumpkin Cheesecake Balls
Can I freeze No Bake Pumpkin Cheesecake Balls?
Absolutely! If you want to make these ahead of time (or just have a *lot* leftover!), freezing is your friend. Just place the coated no bake pumpkin cheesecake balls on a baking sheet lined with parchment paper and freeze them solid. Then, transfer them to a freezer-safe bag or container. They’ll keep for up to a month. When you’re ready to eat them, just thaw them in the fridge for a few hours before serving.
How long do No Bake Pumpkin Cheesecake Balls last?
In the fridge, these delicious pumpkin cheesecake balls will stay fresh for about 3-4 days. But honestly? They’re usually gone way before then! Just make sure to store them in an airtight container to keep them from drying out. I will say, they are best enjoyed soon after making them!
Can I use a different type of cookie for the crust of these No Bake Pumpkin Cheesecake Balls?
Of course! If you’re not a graham cracker fan, you can totally use other cookies for the crust. Vanilla wafers, gingersnaps, or even chocolate cookies would all be delicious. Just crush them up the same way you would the graham crackers and follow the rest of the recipe. Ooh, or even try using crushed Oreos! Okay, now *I’m* getting ideas!
Are these No Bake Pumpkin Cheesecake Balls gluten-free?
Good question! As written, this recipe isn’t gluten-free because of the graham crackers. But, you can easily make them gluten-free by using gluten-free graham crackers! There are some great brands out there now, so just swap them in for the regular ones, and you’re good to go. Now everyone can enjoy these easy no bake pumpkin cheesecake balls!
Estimated Nutritional Information for No Bake Pumpkin Cheesecake Balls
Okay, so I’m no nutritionist (Granny’s recipes never came with calorie counts!), but here’s a rough estimate of the nutritional info for one of these no bake pumpkin cheesecake balls. Keep in mind this is just a ballpark, and it can vary depending on the exact ingredients you use and how big you make the balls. But, hey, at least you’ll have some idea, right?
Per ball, you’re probably looking at roughly:
- Calories: 150-200
- Fat: 10-15g
- Saturated Fat: 6-9g
- Cholesterol: 30-40mg
- Sodium: 50-75mg
- Carbohydrates: 15-20g
- Sugar: 10-15g
- Protein: 2-3g
Remember, these are just estimates! Enjoy them in moderation, as part of a balanced diet… or just enjoy them because they’re delicious! I won’t judge!
Leave a Review for These Delicious No Bake Pumpkin Cheesecake Balls!
Alright, my friend! You’ve made it to the end of the recipe. I really hope you give these no bake pumpkin cheesecake balls a try! And if you do, please, *please* let me know what you think! Did you love them? Did you tweak them? What coatings did you use? I’m dying to hear all about it!
Leave a comment below and tell me your thoughts. Or, if you’re feeling extra generous, give the recipe a star rating! It helps other pumpkin spice lovers find this little gem. And hey, if you snap a picture of your creations, tag me on social media! I’m @RileyBakesGalway on all the platforms. I can’t wait to see your delicious pumpkin cheesecake balls! Happy baking (well, no-baking!)!
Print
Craving 3-Ingredient No Bake Pumpkin Cheesecake Balls?
Enjoy a healthier, homemade version of the iconic Big Mac with these easy-to-make wraps. Packed with flavor and simple ingredients, these wraps are perfect for a quick lunch or a satisfying dinner.
- Total Time: 25 minutes
- Yield: 4 servings 1x
Ingredients
- 1 lb ground beef
- 4 large tortillas or lettuce leaves
- 4 slices cheddar cheese
- 1/4 cup chopped pickles
- 1/4 cup shredded iceberg lettuce
- 2 tbsp chopped onion
- Special Sauce:
- 1/2 cup mayonnaise
- 2 tbsp sweet pickle relish
- 1 tbsp yellow mustard
- 1 tsp white vinegar
- 1/2 tsp paprika
- 1/4 tsp garlic powder
- 1/4 tsp onion powder
Instructions
- Prepare the Special Sauce: In a small bowl, combine mayonnaise, sweet pickle relish, yellow mustard, white vinegar, paprika, garlic powder, and onion powder. Mix well and set aside.
- Cook the ground beef: In a skillet, cook the ground beef over medium heat until browned. Drain off any excess grease. Season with salt and pepper to taste.
- Assemble the wraps: Lay out the tortillas or lettuce leaves. Spread a generous amount of Special Sauce on each.
- Layer the ingredients: Top with cooked ground beef, cheese slices, chopped pickles, shredded lettuce, and chopped onion.
- Wrap it up: Fold or roll the tortillas tightly. If using lettuce leaves, wrap them around the filling.
- Serve immediately.
Notes
- For a low-carb option, use large lettuce leaves instead of tortillas.
- You can make the Special Sauce ahead of time and store it in the refrigerator.
- Feel free to add other toppings like tomatoes or sautéed onions.
- Prep Time: 15 minutes
- Cook Time: 10 minutes
- Category: Main Course
- Method: Skillet
- Cuisine: American
- Diet: Vegetarian
Nutrition
- Serving Size: 1 wrap
- Calories: 550
- Sugar: 5g
- Sodium: 800mg
- Fat: 35g
- Saturated Fat: 12g
- Unsaturated Fat: 23g
- Trans Fat: 0g
- Carbohydrates: 25g
- Fiber: 2g
- Protein: 30g
- Cholesterol: 95mg