 Skip to content
Halloween is just around the corner, and you know what that means, right? Time to get spooky… and bake some seriously cute treats! These Halloween Vampire Bite Cupcakes are the perfect way to impress your friends (and maybe scare them a little!). I’m telling you, they’re super easy to make, even if you’re not exactly a whiz in the kitchen.
From my cozy little kitchen in Galway, I’ve whipped up a batch of these, and trust me, they’re a total showstopper. We’re talking moist cupcakes, delicious frosting, and the coolest vampire bite decoration that’ll have everyone saying “Wow!” Let’s get baking, shall we?
Why You’ll Love These Halloween Vampire Bite Cupcakes
- They’re seriously easy to make! Even if you’ve never decorated a cupcake before, you can totally nail these.
- Talk about eye-catching! These Halloween Vampire Bite Cupcakes look amazing and are perfect for showing off your baking skills (or faking it ’til you make it!).
- Hosting a Halloween party? These are *the* cupcakes to serve. They’re festive, fun, and everyone will be talking about them.
Easy Halloween Vampire Bite Cupcakes Recipe
Honestly, this recipe is foolproof. I’ve broken it down into super simple steps so even beginner bakers can impress their friends. Don’t worry, I won’t tell anyone how easy they were to make!
Cute Halloween Vampire Bite Cupcakes for Parties
Want to be the star of your Halloween bash? These cupcakes are your secret weapon. The vampire bite effect is so fun and spooky, they’re guaranteed to be a hit with everyone at the party!
Delicious Halloween Treats Vampire Cupcakes
Okay, let’s be real, these aren’t just cute, they’re downright delicious! Moist cupcake, yummy frosting, and a little bit of Halloween magic? What’s not to love? Trust me, these will disappear fast!
Ingredients for Halloween Vampire Bite Cupcakes
Alright, gather ’round, my little ghouls and goblins! Here’s what you’ll need to make these spooktacular Halloween Vampire Bite Cupcakes. Don’t worry, it’s mostly stuff you probably already have!
- 1 ½ cups all-purpose flour
- 1 cup packed light brown sugar
- ¾ teaspoon baking powder
- ½ teaspoon baking soda
- ½ teaspoon salt
- ½ cup (1 stick) unsalted butter, softened
- 2 large eggs
- ½ cup buttermilk
- 1 teaspoon vanilla extract
- For the “blood”: red gel food coloring (trust me, gel is the way to go!)
- Your favorite frosting (vanilla or cream cheese works great!)
How to Prepare Halloween Vampire Bite Cupcakes: Step-by-Step Instructions
Okay, here we go! Follow these super simple steps, and you’ll have a batch of spooktacular Halloween Vampire Bite Cupcakes in no time. Don’t be scared, I promise it’s easier than facing Dracula himself!
- Preheat that oven! Set it to 350°F (175°C). This is super important, so don’t skip it! Line a muffin tin with cupcake liners. I like the spooky patterned ones, but plain ones work just fine too.
- Mix the dry stuff: In a big bowl, whisk together the flour, brown sugar, baking powder, baking soda, and salt. Make sure it’s all mixed up evenly.
- Cream the butter: In another bowl (or a stand mixer, if you’re fancy!), cream the softened butter until it’s light and fluffy. We want it nice and smooth, like whipped cream.
- Add the eggs: Beat in the eggs one at a time, then stir in the vanilla extract.
- Alternate dry and wet: Gradually add the dry ingredients to the wet ingredients, alternating with the buttermilk. Start and end with the dry ingredients. Mix until just combined. Don’t overmix! A few lumps are okay.
- Fill those liners: Fill each cupcake liner about ⅔ full. This is key! Too full, and they’ll overflow. Too little, and they’ll be sad and flat.
- Bake ’em up: Bake for 18-20 minutes, or until a toothpick inserted into the center comes out clean.
- Cool completely: Let the cupcakes cool in the tin for a few minutes, then transfer them to a wire rack to cool completely. This is *so* important before you frost them, or the frosting will melt.
- Frost ’em: Frost the cooled cupcakes with your favorite frosting. I’m a big fan of vanilla or cream cheese frosting for these.
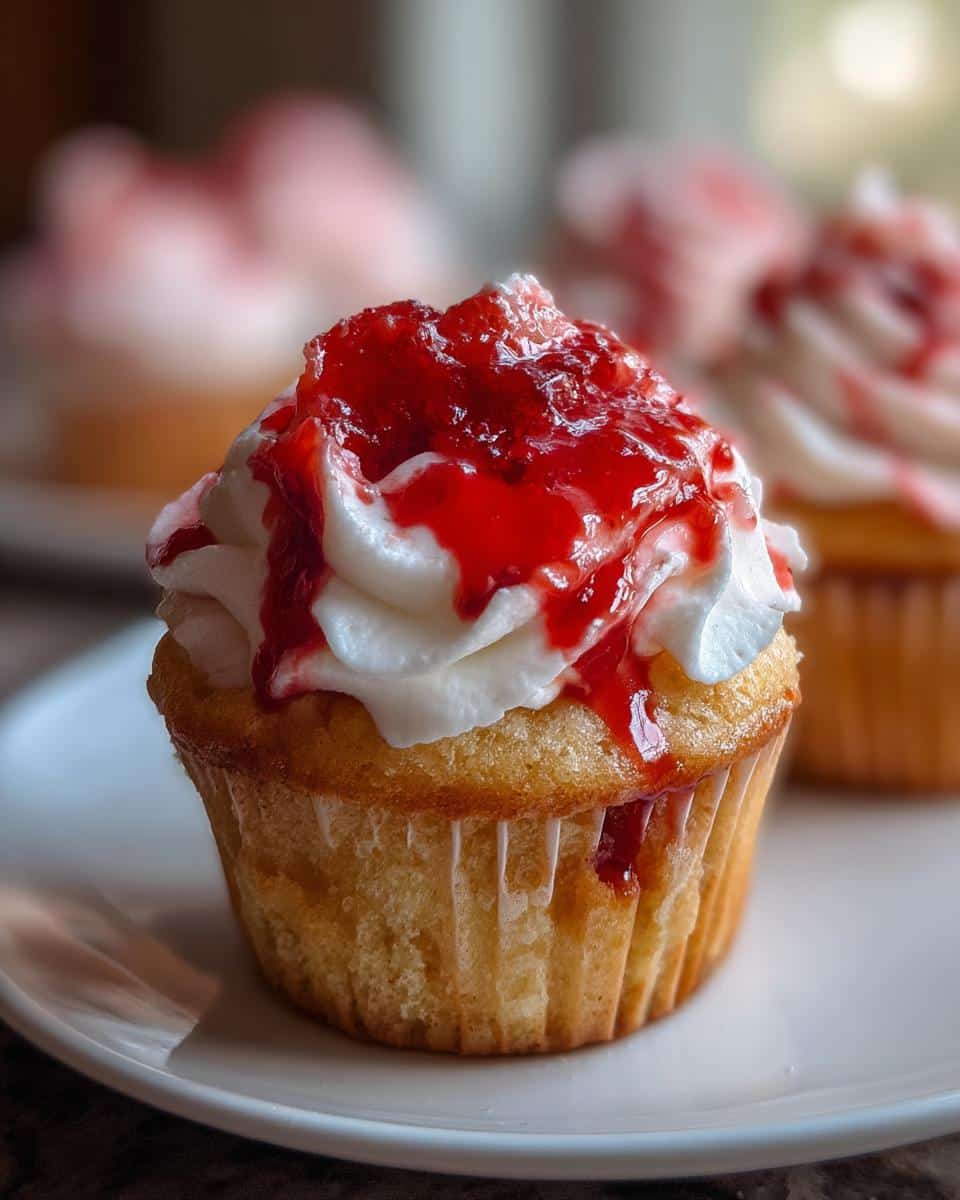
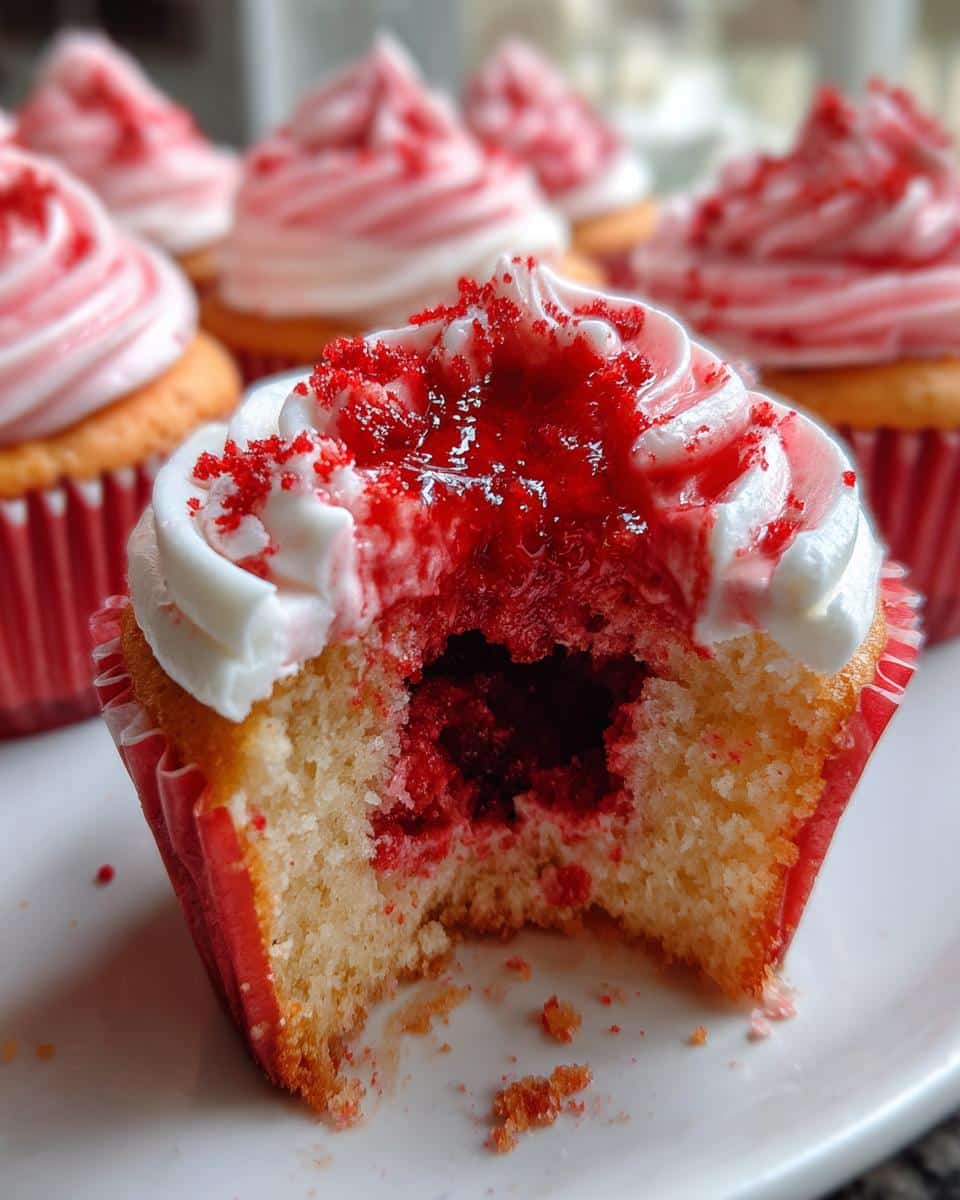
- Vampire bite time! Use a small knife or cookie cutter to make a little “bite” mark on each cupcake. Don’t go too deep, just enough to create a little indentation.
- Blood splatter: Load up a toothpick (or a piping bag if you’re feeling extra) with red gel food coloring and carefully fill the “bite” marks with the “blood.” Let it drip down the sides a little for extra spookiness. Careful, it splatters!
- Ta-da! You’ve got yourself some seriously awesome Halloween Vampire Bite Cupcakes! Now, try not to eat them all at once!
Tips for Perfect Halloween Vampire Bite Cupcakes
Want to take your Halloween Vampire Bite Cupcakes from “meh” to “OMG!”? Here are a few tricks I’ve learned along the way. First, and I can’t stress this enough, make sure those cupcakes are *completely* cool before you even think about frosting. Warm cupcakes = melty frosting disaster. Also, gel food coloring is your best friend for that vibrant “blood” effect. The liquid stuff just doesn’t cut it, trust me!
Making the Perfect Halloween Vampire Bite Cupcakes Decoration
Okay, so the vampire bite is what makes these cupcakes, right? For the bite marks, I like using a small, round cookie cutter, but a knife works great too! Just gently press it in. And for the “blood,” a toothpick gives you the most control. But if you’re feeling fancy, a piping bag with a small tip works wonders. Don’t be afraid to get a little drippy!
Choosing the Best Cupcake Base for your Halloween Vampire Bite Cupcakes
Vanilla is a classic for a reason, but don’t be afraid to get creative! Chocolate cupcakes give a darker, more dramatic vibe. Or, how about red velvet for a truly spooky touch? It’s all about what you like! I think the red velvet with cream cheese frosting looks eerily good!
Ingredient Notes and Substitutions for Your Halloween Vampire Bite Cupcakes
Let’s talk ingredients, shall we? If you’re out of buttermilk, don’t panic! A tablespoon of lemon juice or vinegar in regular milk works like a charm. And if red food coloring freaks you out (I get it!), beet juice can give you a more natural (but less vibrant) “blood” effect. Just a heads up, it might taste a *tiny* bit earthy. Who knows, maybe vampires like that!
FAQ About Halloween Vampire Bite Cupcakes
Got questions about these fang-tastic Halloween Vampire Bite Cupcakes? I bet you do! Here are a few of the most common questions I get asked. And if you have any more, just shout!
How to Store Halloween Vampire Bite Cupcakes?
Okay, so if you actually *don’t* eat them all in one sitting (which, let’s be honest, is a challenge!), the best way to store these cute Halloween vampire cupcakes is in an airtight container at room temperature. They’ll stay fresh for about 2-3 days. If it’s super hot, you can pop them in the fridge, but the frosting might get a little firm.
Can I Make Halloween Vampire Bite Cupcakes Ahead of Time?
Absolutely! You can totally bake the cupcakes a day or two in advance. Just store them in an airtight container at room temperature. Then, frost and decorate them the day you’re planning to serve them. That way, the delicious Halloween treats vampire cupcakes are fresh and fabulous!
What’s the Best Frosting for Halloween Vampire Bite Cupcakes?
Ooh, good question! I’m a big fan of vanilla or cream cheese frosting because they’re light and let the “blood” really pop. But honestly, any frosting you love will work! Chocolate frosting would be super yummy too. Experiment and see what you like best for these easy Halloween vampire cupcakes!
Serving Suggestions for Your Halloween Vampire Bite Cupcakes
So, you’ve got these awesome Halloween Vampire Bite Cupcakes, but what do you serve with them? How about some spooky punch with gummy worms? Or maybe some ghost-shaped cookies? Honestly, anything Halloween-themed goes! My favorite is a big bowl of popcorn for a movie night!
Estimated Nutritional Information for Halloween Vampire Bite Cupcakes
Alright, let’s talk numbers! Now, keep in mind, this is just an estimate, because it depends on the exact ingredients you use and how big you make your cupcakes. But roughly, one of these spooky Halloween Vampire Bite Cupcakes clocks in at:
- Calories: 250-300 (Hey, it’s Halloween!)
- Fat: 12-15g
- Protein: 2-3g
- Carbs: 35-40g
So, yeah, maybe not the healthiest snack in the world, but hey, it’s a treat! And totally worth it for a fun Halloween party! Just enjoy them in moderation, okay?
Rate This Halloween Vampire Bite Cupcakes Recipe
Did you try these Halloween Vampire Bite Cupcakes? Let me know what you think! Rate the recipe below and leave a comment – I’d love to hear how they turned out for you!
Print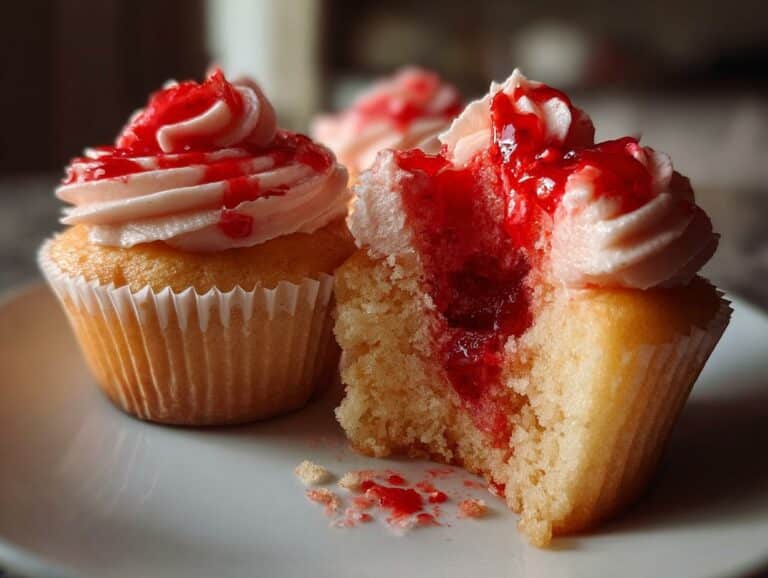
Halloween Vampire Bite Cupcakes: Nail it in 19 Minutes
These delightful pecan pie balls are a no-bake treat that captures the essence of classic pecan pie in a convenient, bite-sized form. Perfect for holidays or any occasion, they are easy to make and sure to be a crowd-pleaser.
- Total Time: 45 minutes (including chilling time)
- Yield: About 18-20 balls 1x
Ingredients
- 1 cup finely chopped pecans, plus more for rolling
- 1/2 cup creamy peanut butter
- 1/4 cup honey or maple syrup
- 1/4 cup rolled oats
- 1 teaspoon vanilla extract
- 1/2 teaspoon cinnamon
- Pinch of salt
Instructions
- In a medium bowl, combine the finely chopped pecans, peanut butter, honey or maple syrup, rolled oats, vanilla extract, cinnamon, and salt.
- Stir the ingredients together until well combined and a dough-like consistency forms.
- Roll the mixture into small balls, about 1 inch in diameter.
- If desired, roll the balls in additional finely chopped pecans for extra texture and flavor.
- Place the pecan pie balls on a baking sheet lined with parchment paper.
- Refrigerate for at least 30 minutes to allow them to firm up.
- Serve chilled.
Notes
- For a gluten-free option, ensure your rolled oats are certified gluten-free.
- You can substitute almond butter or cashew butter for peanut butter.
- Add a tablespoon of chia seeds or flax seeds for extra nutrients.
- Store the pecan pie balls in an airtight container in the refrigerator for up to a week.
- Prep Time: 15 minutes
- Cook Time: 0 minutes
- Category: Dessert
- Method: No-Bake
- Cuisine: American
- Diet: Vegetarian
Nutrition
- Serving Size: 1 ball
- Calories: 120
- Sugar: 8g
- Sodium: 20mg
- Fat: 8g
- Saturated Fat: 1.5g
- Unsaturated Fat: 6.5g
- Trans Fat: 0g
- Carbohydrates: 10g
- Fiber: 1g
- Protein: 3g
- Cholesterol: 0mg