 Skip to content
Okay, picture this: it’s a chilly October evening here in Galway, the wind’s howling outside, and the only thing that’ll make it feel right is a batch of warm, gooey brownies. But not just *any* brownies, mind you. We’re talking Halloween Oreo Brownies, the kind that make you want to put on a spooky movie and share with all your favorite ghouls and goblins! And trust me, this Halloween Oreo Brownies recipe is so easy, even the littlest monsters can help. My Granny always said the best treats are the ones made with a little love (and a lot of chocolate!). So let’s get baking, shall we?

Why You’ll Love This Halloween Oreo Brownies Recipe
Quick and Easy Halloween Treat
Honestly, who has time for complicated recipes when there are costumes to plan and pumpkins to carve? This Halloween Oreo Brownies recipe is seriously simple. I’m talking from-craving-to-in-your-mouth in under an hour! It’s so straightforward, you’ll wonder why you ever bothered with other brownie recipes. Trust me, this is the easy Halloween treat you’ve been searching for!
Festive and Spooky Halloween Oreo Brownies
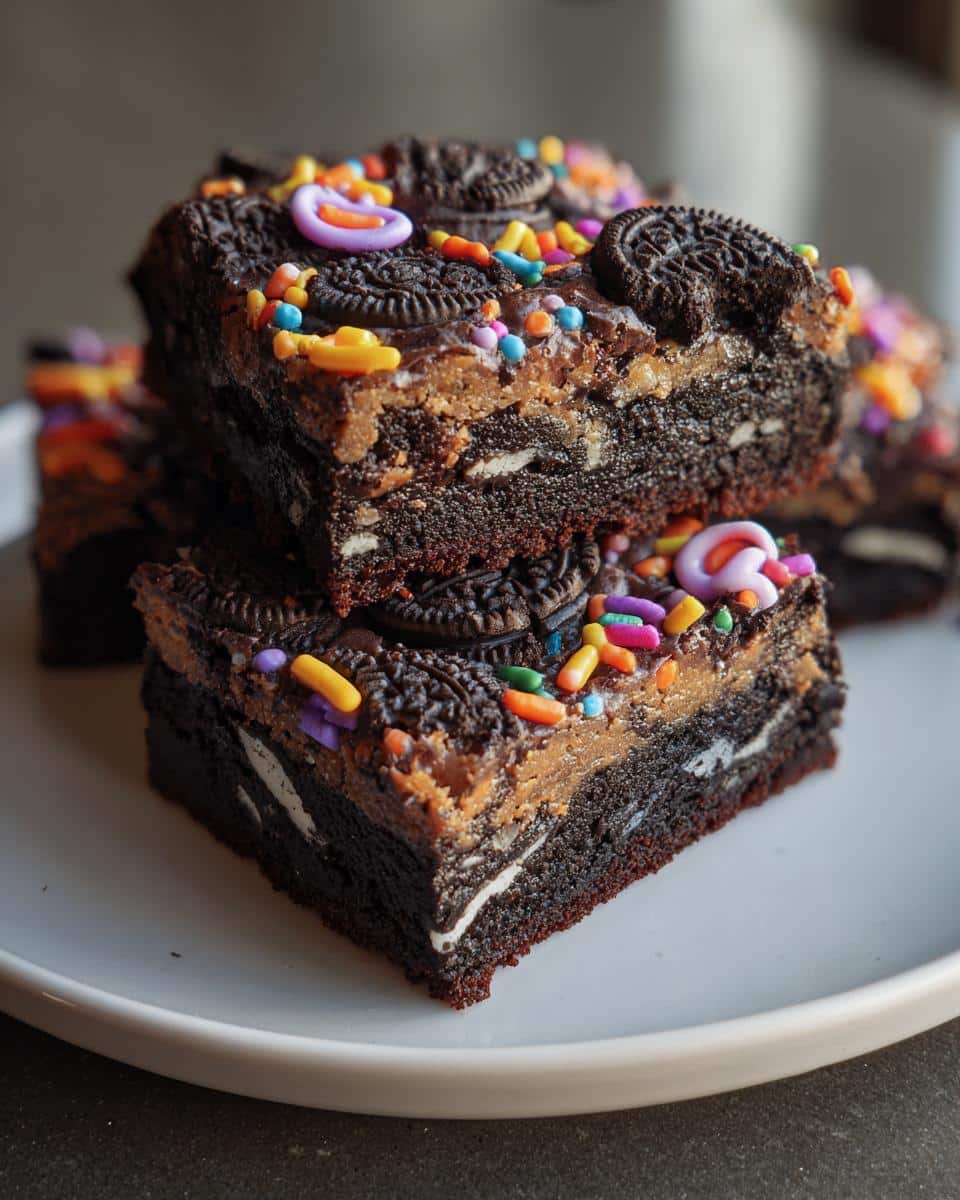
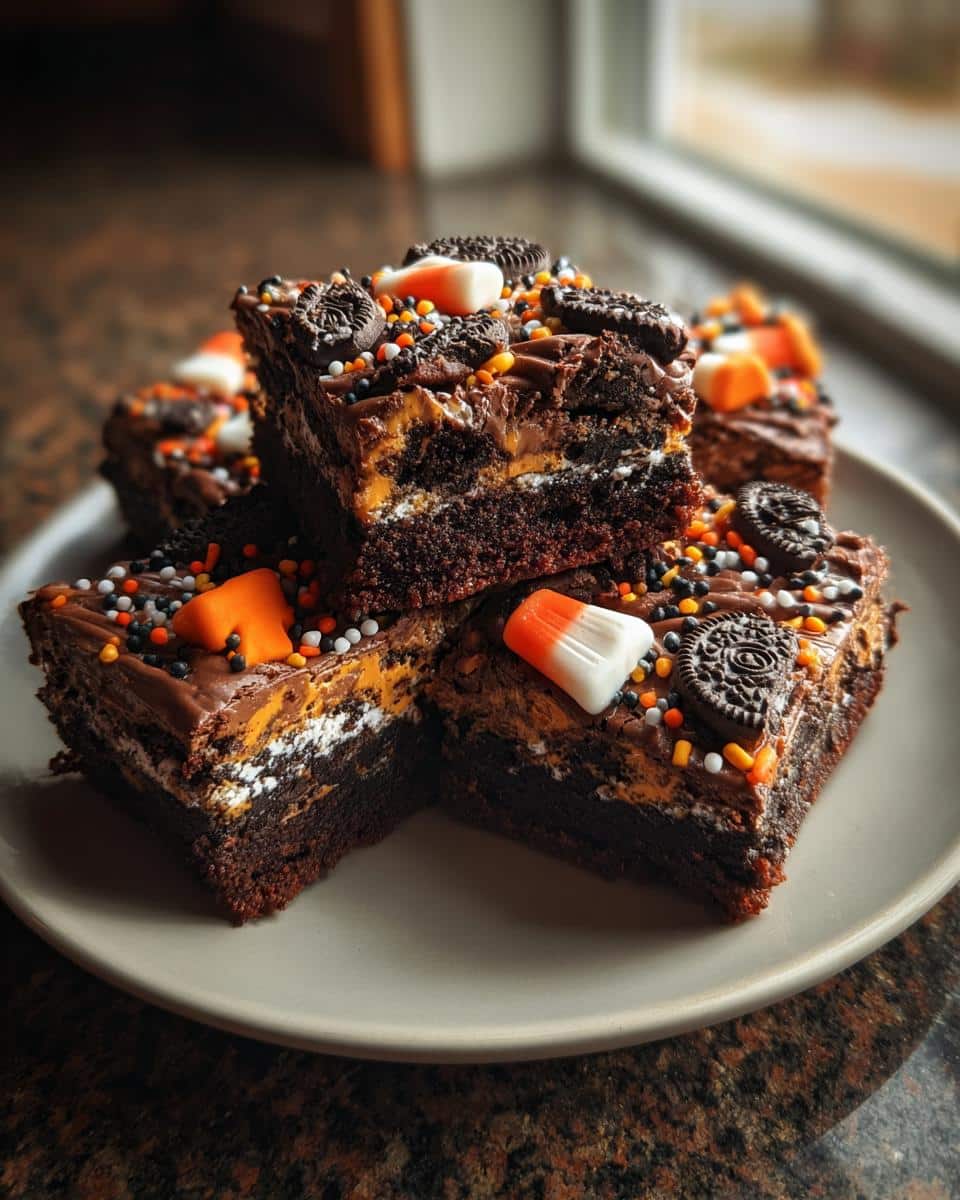
These aren’t just any brownies; they’re *Halloween* brownies! The Oreos baked right in give them that fantastic spooky look, and you can always jazz them up with some Halloween sprinkles (more on that later!). They’re perfect for showing off on Pinterest – get ready for all the “oohs” and “aahs!” My favorite part is seeing the kids’ faces light up when they see these. Talk about festive!
Delicious Combination of Brownies and Oreos
Okay, let’s be real: brownies are amazing. Oreos are amazing. Put them together, and you’ve got pure magic! The fudgy brownie with the crunchy Oreo? It’s a texture party in your mouth! The creamy filling of the Oreo just melts into the brownie as it bakes…wow. And the chocolate? It’s just… *chef’s kiss*. Seriously, this Halloween Oreo brownies recipe is a guaranteed crowd-pleaser.
Perfect for Halloween Parties and Gatherings
Got a Halloween party coming up? Want to be the star baker? These Halloween Oreo brownies are your secret weapon. They’re easy to transport, everyone loves them, and they look absolutely adorable on a platter. Plus, they’re great for kids and adults alike. So skip the store-bought sweets and whip up a batch of these – you’ll be the hero of the party, I promise!
The Best Halloween Oreo Brownies Recipe Ingredients
Alright, let’s gather our goodies! This Halloween Oreo Brownies recipe is super flexible – you can use your favorite brownie mix to keep things speedy, or go totally homemade if you’re feeling fancy. Either way, these are the essentials you’ll need to make some seriously spooky treats!
- Brownie Mix: One box (usually around 18-20 ounces) of your favorite brownie mix. I’m a sucker for a good fudge brownie mix, but hey, you do you! If you’re going from scratch, you’ll need the usual suspects: flour, sugar, cocoa powder, butter, eggs, etc. I’ll give you some notes on that later!
- Eggs: Whatever your brownie mix calls for (usually 2 large eggs). If you’re doing it from scratch, most recipes need around that many, too. Make sure they’re large!
- Oil: Again, follow your brownie mix instructions. Usually, it’s about 1/2 cup of vegetable oil. But honestly? Melted butter works wonders if you want extra richness. Just sayin’!
- Water: The amount the brownie mix directs. Easy peasy!
- Halloween Oreos: One package of Halloween Oreos (the ones with the orange creme filling!). I just love how festive they look! You’ll need about 20-24 of them, depending on how many brownies you want to be Oreo-packed. Don’t worry if you snack on a few while you’re at it… I won’t tell!
How to Make This Halloween Oreo Brownies Recipe: Step-by-Step Instructions
Preparing the Brownie Batter for Your Halloween Oreo Brownies
First things first: let’s get that brownie batter ready! Preheat your oven to 350°F (175°C). This is super important, so don’t skip it! Now, grab a big bowl and mix together your brownie mix, eggs, oil, and water according to the package directions. Don’t overmix! Just stir until everything’s combined. A few lumps are totally fine. If you *are* going from scratch, mix your dry ingredients, then add your melted butter and eggs. I find it easiest to use an electric mixer for this, but a good old wooden spoon works just as well. The batter should be nice and thick. Mmm, already smells good, doesn’t it?
Adding the Halloween Oreos to the Brownies
Now for the fun part! Grease a 9×13 inch baking pan. You can use butter or cooking spray – whatever you prefer. Pour about half of the brownie batter into the pan, spreading it evenly. Then, arrange those Halloween Oreos in a single layer over the batter. I like to nestle them in a little, so they don’t slide around. Now, gently pour the remaining brownie batter over the Oreos, trying to cover them as much as possible. Don’t worry if some of the Oreos peek through – it just adds to the spooky charm!
Baking Your Spooky Halloween Oreo Brownies Recipe
Pop that pan into the preheated oven and bake for 25-30 minutes. Keep a close eye on them! You’ll know they’re done when a toothpick inserted near the center comes out with fudgy crumbs (not wet batter!). Remember, ovens are different, so start checking around 25 minutes. Overbaking is a brownie sin! You want them to be fudgy and gooey, not dry and crumbly. Trust your instincts!
Cooling and Cutting Your Halloween Oreo Brownies
Once the brownies are baked, take them out of the oven and let them cool completely in the pan. I know, it’s torture, but trust me, it’s worth it! If you try to cut them while they’re still warm, they’ll be a gooey mess (a delicious mess, but still…). For clean cuts, I like to chill them in the fridge for about 30 minutes before slicing. Use a sharp knife and wipe it clean between each cut. And there you have it – perfect Halloween Oreo Brownies, ready to be devoured!
Tips for the Perfect Halloween Oreo Brownies Recipe
Okay, so you’ve got the basics down, but wanna take these Halloween Oreo brownies to the *next level*? Here are a few of my tried-and-true tips to ensure brownie perfection every single time!
- Don’t Overmix the Batter: I know I already said it, but it’s worth repeating! Overmixing develops the gluten in the flour, which leads to tough brownies. We want fudgy, not chewy! Just stir until everything’s *barely* combined.
- Oreo Placement is Key: I like to arrange my Oreos in a way that ensures every brownie piece gets a good chunk of Oreo goodness. Think strategically! A little planning goes a long way.
- Underbake, Underbake, Underbake: Seriously. Fudgy brownies are the best brownies, and the secret is to slightly underbake them. They’ll continue to set up as they cool, so don’t worry if they seem a little soft when you take them out of the oven.
- Use Room Temperature Ingredients (if going from scratch): This helps everything blend together more smoothly and evenly. Plus, it helps prevent the brownies from being too dense.
- Line Your Pan with Parchment Paper: This makes it *so* much easier to lift the brownies out of the pan for cutting. Trust me, it’s a game-changer! Plus, less cleanup!
Halloween Oreo Brownies Recipe Variations
Different Oreo Flavors for Your Halloween Oreo Brownies
Want to shake things up a bit? Of course, you do! The beauty of this Halloween Oreo Brownies recipe is how easy it is to customize. Forget the orange creme? No way! But hear me out—think about using different Oreo flavors! Golden Oreos would be super fun. Or what about those Mint Oreos for a chocolate-mint kick? Peanut Butter Oreos? Okay, I’m getting hungry just thinking about it! Seriously, the sky’s the limit! Just swap out the Halloween Oreos for your favorite flavor. Trust me, it’s a game-changer!
Adding Sprinkles and Frosting for a Festive Touch
Okay, so the Halloween Oreos already make these brownies pretty darn festive, but why stop there? Let’s add some sprinkles! Grab some Halloween-themed sprinkles – you know, the ones with the ghosts and bats and pumpkins? Sprinkle them on top of the batter *before* you bake the brownies. Or, for an extra touch of sweetness, whip up a simple chocolate frosting and spread it on top after the brownies have cooled. Then, go wild with the sprinkles! My kids love helping with this part. A little frosting and sprinkles can turn these Halloween Oreo brownies into a total masterpiece! You could even add some candy corn…if you’re into that kind of thing. 😉
Halloween Oreo Brownies Recipe: Frequently Asked Questions
Can I Use a Different Type of Oreo in This Halloween Oreo Brownies Recipe?
Absolutely! That’s the beauty of this Halloween Oreo Brownies recipe – it’s super versatile! While I love the festive look of the Halloween Oreos, you can totally swap them out for any Oreo flavor you like. Classic Oreos, Golden Oreos, Mint Oreos… go wild! Just make sure they’re the regular size, so they fit nicely in the brownie batter. Trust me, whatever you choose, they’ll be delicious!
How Do I Prevent My Halloween Oreo Brownies from Being Too Dry?
Dry brownies? No, thank you! The key to moist Halloween Oreo Brownies is to not overbake them. Remember that toothpick test? You want fudgy crumbs, not a clean toothpick. Also, make sure you’re not overmixing the batter (see my tips above!). And, if you’re using a brownie mix, consider adding a tablespoon or two of sour cream or Greek yogurt to the batter. It adds extra moisture and richness. Nobody wants a dry Halloween treat!
Can I Make This Halloween Oreo Brownies Recipe Ahead of Time?
You bet! These Halloween Oreo Brownies are perfect for making ahead of time. Once they’ve cooled completely, cut them into squares and store them in an airtight container at room temperature for up to 3 days. Or, for even longer storage, you can freeze them for up to a month! Just wrap them individually in plastic wrap and then place them in a freezer-safe bag. When you’re ready to eat them, let them thaw at room temperature for a bit. They’ll be just as delicious as the day you baked them! Perfect for those busy Halloween schedules!
How to Store Your Halloween Oreo Brownies
So, you’ve managed to not eat all the Halloween Oreo Brownies in one sitting? Impressive! Here’s how to keep those leftovers fresh and delicious (if there *are* any leftovers, that is!). The trick is to keep ’em sealed up tight!
- Room Temperature: If you’re planning on eating them within a few days (let’s be honest, they won’t last long!), just store them in an airtight container at room temperature. They’ll stay nice and fudgy for about 2-3 days. My favorite is a good old Tupperware container – works like a charm!
- Fridge: Want to keep them around a little longer? Pop them in the fridge! They’ll stay good for up to a week. Just make sure they’re well-sealed, so they don’t dry out. I sometimes add a piece of wax paper on top, right against the brownies, before sealing the container.
- Freezer: Believe it or not, these Halloween Oreo Brownies freeze really well! Wrap each brownie individually in plastic wrap, then place them in a freezer-safe bag or container. They’ll keep in the freezer for up to a month (or even longer, but who are we kidding? They’ll be gone before then!). When you’re ready to eat one, just let it thaw at room temperature for about 30 minutes. It’ll be like you just baked it!
And here’s a little secret: sometimes, I like to sneak a frozen brownie straight from the freezer. Don’t judge! It’s like a fudgy, Oreo-filled ice cream bar. 😉
Estimated Nutritional Information for Halloween Oreo Brownies
Alright, let’s talk numbers! Now, I’m no nutritionist, so this is just a *rough* estimate, okay? Keep in mind that the exact nutritional information for these Halloween Oreo Brownies will depend on the specific ingredients you use (like the brand of brownie mix and the type of Oreos). But here’s a general idea of what you’re looking at, per brownie:
- Calories: Around 250-300 (hey, it’s a treat!)
- Fat: Roughly 12-15 grams
- Saturated Fat: About 6-8 grams (butter and Oreos, gotta love ’em!)
- Cholesterol: Around 30-40mg
- Sodium: About 150-200mg
- Carbohydrates: Somewhere around 35-40 grams
- Fiber: Maybe 1-2 grams (don’t count on it being a health food!)
- Sugar: Oh, you know it’s gonna be up there! Probably around 20-25 grams (but hey, it’s Halloween!).
- Protein: A couple grams (from the eggs and flour, mostly).
So, yeah… they’re not exactly health food. But they ARE delicious! And sometimes, you just need a spooky, chocolatey treat, right? Don’t sweat the numbers too much. Just enjoy them in moderation, and have a happy Halloween!
Enjoyed This Halloween Oreo Brownies Recipe?
Well, there you have it! My super easy, super delicious Halloween Oreo Brownies recipe. I truly hope you loved it as much as my family does! If you gave it a try, I’d absolutely *love* to hear about it! Did you use classic Oreos or go wild with a different flavor? Did you add sprinkles or frosting? Tell me everything in the comments below!
And if you thought these brownies were as spooktacular as I do, pretty please leave a rating for the recipe! It helps other brownie-lovers find it. 😉
Last but not least, if you made these and snapped a picture (especially if they’re all decked out in Halloween sprinkles!), share it on social media! Tag me so I can see your amazing creations! Happy baking, and have a frightfully fun Halloween!
Print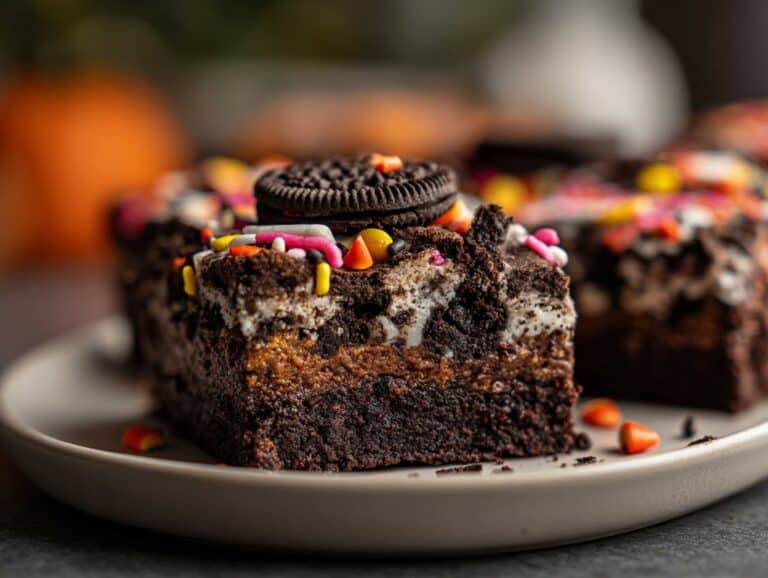
Halloween Oreo Brownies Recipe: Sinful 30-Minute Treat
A vibrant and zesty Mexican street corn pasta salad, perfect for potlucks and summer gatherings. This easy recipe combines creamy pasta with the smoky, spicy flavors of elote, featuring corn, chili powder, lime, and cilantro.
- Total Time: 25 minutes
- Yield: 6-8 servings 1x
Ingredients
- 1 pound pasta (such as rotini or penne)
- 2 cups corn kernels (fresh, frozen, or canned)
- 1/2 cup mayonnaise
- 1/4 cup sour cream
- 1/4 cup crumbled cotija cheese
- 2 tablespoons lime juice
- 1 teaspoon chili powder
- 1/2 teaspoon cumin
- 1/4 teaspoon garlic powder
- Salt and black pepper to taste
- 1/4 cup chopped fresh cilantro
- Optional: 1/4 cup finely chopped red onion
- Optional: 1/4 cup diced jalapeño
Instructions
- Cook pasta according to package directions. Drain and rinse with cold water.
- In a large bowl, whisk together mayonnaise, sour cream, cotija cheese, lime juice, chili powder, cumin, and garlic powder.
- Add cooked pasta, corn kernels, cilantro, red onion (if using), and jalapeño (if using) to the bowl.
- Stir to combine all ingredients well.
- Season with salt and pepper to taste.
- Chill for at least 30 minutes before serving to allow flavors to meld.
Notes
- For a spicier salad, add more chili powder or jalapeño.
- If cotija cheese is unavailable, feta cheese can be substituted.
- This salad can be made ahead of time and stored in the refrigerator for up to 3 days.
- Prep Time: 15 minutes
- Cook Time: 10 minutes
- Category: Salad
- Method: No-Cook (except pasta)
- Cuisine: Mexican-inspired
- Diet: Vegetarian
Nutrition
- Serving Size: 1 cup
- Calories: approx. 350
- Sugar: approx. 6g
- Sodium: approx. 400mg
- Fat: approx. 18g
- Saturated Fat: approx. 4g
- Unsaturated Fat: approx. 14g
- Trans Fat: 0g
- Carbohydrates: approx. 38g
- Fiber: approx. 3g
- Protein: approx. 8g
- Cholesterol: approx. 20mg