 Skip to content
Okay, friends, let’s talk comfort food. I’m Riley, and if there’s one thing I know, it’s how to make a dish that feels like a warm hug. And trust me, these garlic bread rolls? They’re basically a culinary embrace! I grew up watching my granny in Galway whip up the most amazing breads, and I’ve taken that love and turned it into this super easy (and totally addictive) recipe.
Seriously, from the first whiff of garlic to the last buttery bite, you’re gonna be hooked. This isn’t just bread; it’s an experience. It’s the perfect side for pasta night, a crowd-pleasing appetizer, or, let’s be honest, a totally acceptable dinner when paired with a cozy movie night. So, grab your apron, and let’s get baking!
Why You’ll Love This Garlic Bread Rolls Recipe
Quick and Easy Garlic Bread Rolls
Seriously, who has time for complicated recipes? Not me! This easy garlic bread rolls recipe is designed for busy folks (like us!). From start to finish, you’re looking at maybe an hour and a half, most of which is just letting the dough do its thing. And the actual hands-on time? Minimal. You’ll be amazed how quickly these come together!
Flavorful Garlic Bread Rolls from Scratch
Okay, I know “from scratch” can sound intimidating, but trust me, it’s worth it! These aren’t your average, store-bought homemade garlic bread rolls. We’re talking real garlic, real butter, and a dough that’s made with love (and a few simple ingredients). The flavor? Out of this world. My favorite part is that amazing garlic aroma that fills your kitchen while they bake. Pure heaven!
Perfect Garlic Bread Rolls for Any Occasion
Need a crowd-pleaser for your next party? Want to impress your family on pasta night? Or maybe you just need a little carb-y comfort on a Tuesday (no judgement here!). These garlic bread rolls are *always* a hit. They’re so versatile! Serve ’em alongside your favorite soup, pile ’em high on a platter for game day, or just enjoy ’em straight from the oven. You really can’t go wrong!
Ingredients for the Best Garlic Bread Rolls
Dough Ingredients
Alright, let’s gather our supplies! For the dough, you’ll need:
- 3 cups all-purpose flour (plus extra for dusting – about ½ cup should do it!)
- 1 packet (or 2 ¼ teaspoons) of active dry yeast – trust me, check the expiration date!
- 1 ¼ cups warm water (about 105-115°F – think baby bath temperature!)
- 1 teaspoon granulated sugar – just a pinch to get the yeast happy.
- 1 teaspoon salt – don’t skip this! It balances everything out.
- 2 tablespoons olive oil – adds a little richness and helps with a smooth dough.
Garlic Butter Ingredients
Now, for the *really* good stuff – the garlic butter! Here’s what you’ll need:
- ½ cup (1 stick) unsalted butter, softened – gotta be soft, or it’ll be a pain to mix!
- 6 cloves garlic, minced – and I mean *minced*. No big chunks here. I use a garlic press, but finely chopping works too!
- ¼ cup fresh parsley, chopped – fresh is best, but a tablespoon of dried will do in a pinch.
- ½ teaspoon garlic powder – yeah, we’re already using fresh, but this just kicks it up a notch!
- ¼ teaspoon salt – taste and adjust!
- ¼ teaspoon black pepper – freshly ground is always a win.
How to Make Garlic Bread Rolls: Step-by-Step Instructions
Preparing the Dough for Garlic Bread Rolls
Okay, let’s get this dough started! First, grab a big bowl (or the bowl of your stand mixer if you’re fancy). Pour in that warm water, sprinkle in the sugar, and then add the yeast. Give it a gentle stir and let it sit for about 5-10 minutes. You should see it get foamy – that means the yeast is alive and happy!
Next, add the olive oil, salt, and about half of the flour to the bowl. If you’re using a stand mixer, use the dough hook. If you’re doing it by hand (like my granny used to!), grab a sturdy spoon. Mix until it starts to come together, then gradually add the rest of the flour, mixing until you have a shaggy dough.
Now comes the fun part – kneading! Turn the dough out onto a lightly floured surface and knead for about 5-7 minutes, until it’s smooth and elastic. If it’s too sticky, add a little more flour, a tablespoon at a time. You want it to be tacky, but not glued to your hands. If you’re using a stand mixer, knead with the dough hook for about 5 minutes on medium speed.
Once your dough is kneaded, place it in a lightly oiled bowl, turning to coat. Cover with a clean towel or plastic wrap and let it rise in a warm place for about an hour, or until doubled in size. This is crucial, so be patient! A warm oven (turned off!) is a great spot.
Shaping the Garlic Bread Rolls
Alright, dough’s doubled? Awesome! Gently punch it down to release the air. Turn it out onto a lightly floured surface and divide it into 12 equal pieces. Now, you can get creative! You can just roll each piece into a ball for simple rolls. Or, for a little flair, try garlic knots! To make knots, roll each piece into a rope about 6-8 inches long, then tie it into a knot. Easy peasy!
Place the shaped rolls on a baking sheet lined with parchment paper (this prevents sticking and makes cleanup a breeze!). Cover them loosely with plastic wrap and let them rise again for about 30 minutes. While they’re rising, let’s make that glorious garlic butter!
Making the Garlic Butter for Garlic Bread Rolls
This is SO easy, you won’t believe it. In a small bowl, combine the softened butter, minced garlic, chopped parsley, garlic powder, salt, and pepper. Mix it all together until it’s well combined. Trust me, resist the urge to just eat it with a spoon (okay, maybe just a tiny taste!).
Baking the Garlic Bread Rolls to Perfection
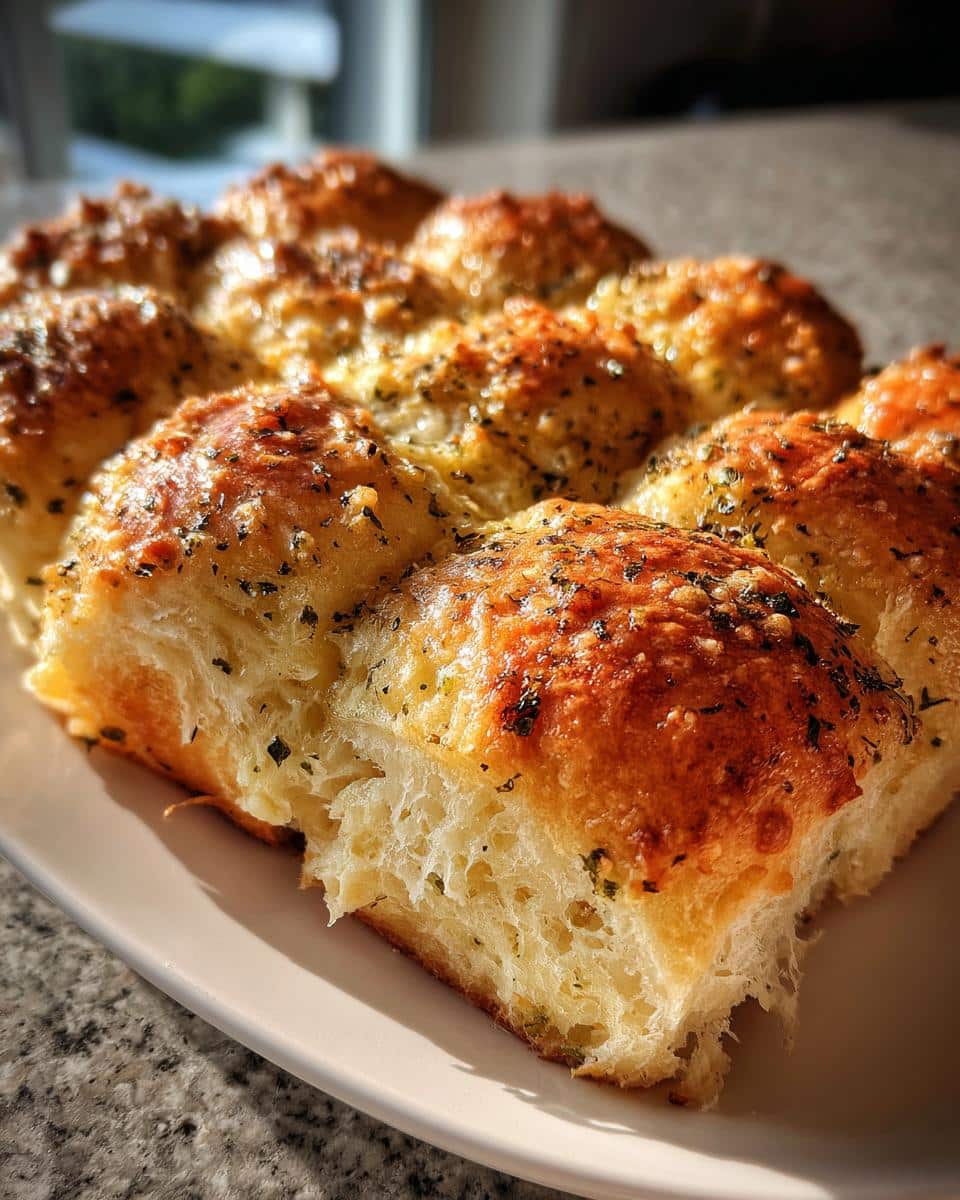
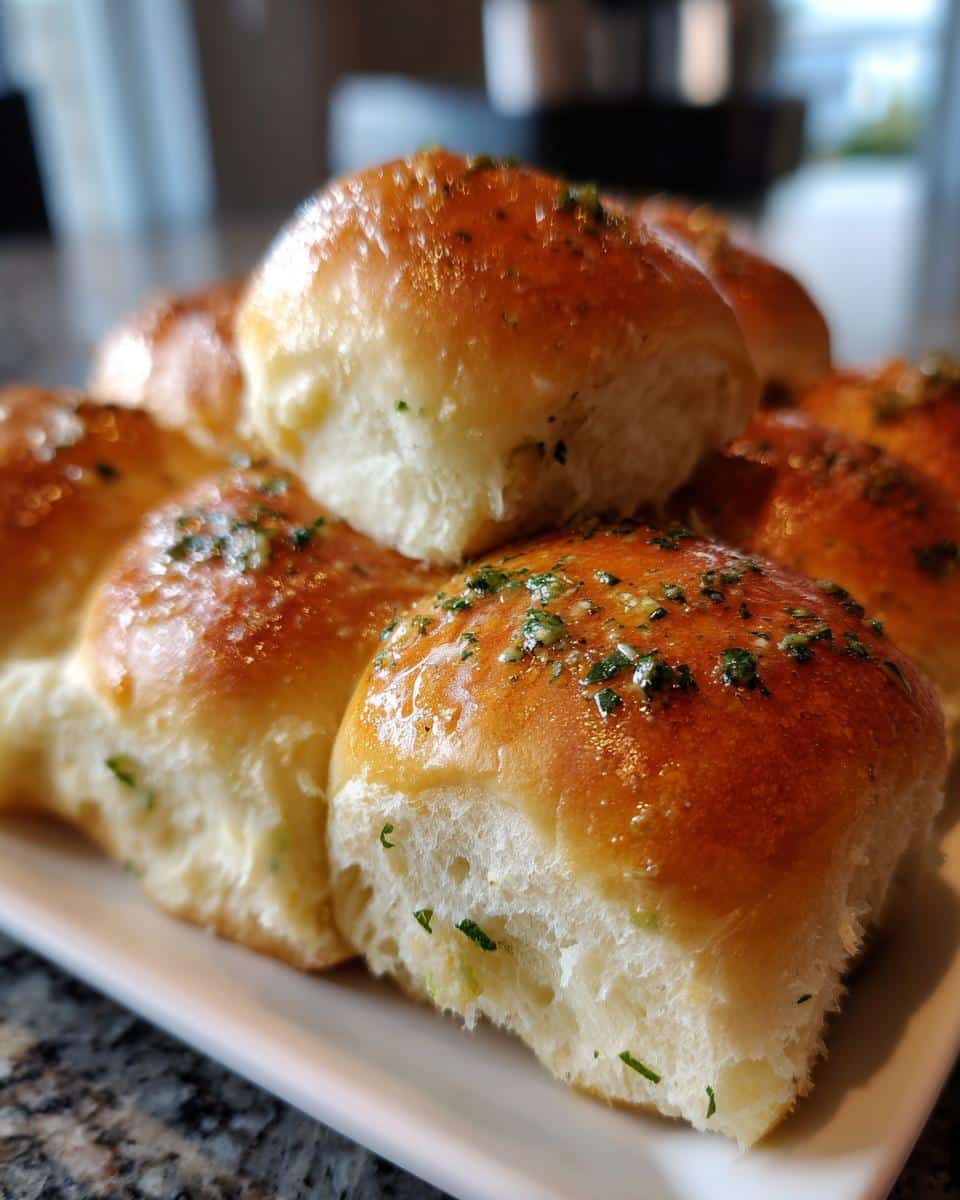
Preheat your oven to 375°F (190°C). Now, brush those beautiful, puffy rolls with the garlic butter. Don’t be shy – get every nook and cranny! Bake for 15-20 minutes, or until they’re golden brown and gorgeous. Keep an eye on them, because ovens can vary! If they start to get too dark, just tent them with foil.
Once they’re out of the oven, brush them with any remaining garlic butter (yes, even more!). Let them cool slightly before serving. And try not to eat them all in one sitting… but I won’t judge if you do!
Tips for Perfect Garlic Bread Rolls
Achieving the Perfect Texture in Your Garlic Bread Rolls
Okay, so the texture is KEY, right? For that soft, pillowy inside and slightly crusty outside, here’s my secret: don’t over-knead the dough! Over-kneading makes them tough. Also, that second rise? Don’t skip it! It’s what gives them that light, airy texture. And make sure your oven is *actually* at 375°F (190°C). An oven thermometer is your friend, trust me!
Maximizing Garlic Flavor in Garlic Bread Rolls
Garlic lovers, listen up! First, use *fresh* garlic. Seriously, the pre-minced stuff just doesn’t compare. And don’t be afraid to add a little extra! I sometimes even throw in a clove or two *more* than the recipe calls for (shhh!). Also, letting the garlic butter sit for about 15 minutes before brushing it on the rolls really helps the flavors meld together. Oh, and a pinch of red pepper flakes in the garlic butter? Game changer!
Preventing Dryness in Your Garlic Bread Rolls
Dry garlic bread? No, thank you! To keep these babies moist and delicious, don’t over-bake them! Start checking them around 15 minutes, and pull them out as soon as they’re golden brown. Brushing them with that extra garlic butter *after* they come out of the oven is also a lifesaver. And if you’re making them ahead of time, wrap them tightly in foil to keep them from drying out. Nobody wants a hockey puck!
Variations on Garlic Bread Rolls
Garlic Parmesan Bread Rolls
Okay, who doesn’t love parmesan cheese? To make these extra cheesy, just add about ½ cup of grated parmesan cheese to the garlic butter mixture *before* you brush it on the rolls. I like to use freshly grated parmesan for the best flavor, but the pre-shredded stuff works in a pinch. You can also sprinkle a little extra parmesan on top of the rolls before baking for a super cheesy crust! Trust me, the nutty, salty flavor of the parmesan takes these garlic bread rolls to a whole new level.
Pull Apart Garlic Bread Rolls
Want a fun and interactive appetizer? Try making pull-apart garlic bread rolls! Instead of shaping the dough into individual rolls, roll each piece into a small ball. Then, arrange the balls in a greased cast-iron skillet or cake pan, nestling them close together. Brush with the garlic butter, and bake as directed. The result? A gorgeous, shareable loaf of garlicky goodness that everyone can pull apart and enjoy! It’s seriously the perfect party food.
Spicy Garlic Bread Rolls
Feeling a little fiery? Let’s kick things up a notch! Add ¼ – ½ teaspoon of red pepper flakes to the garlic butter for a spicy kick. If you’re a serious spice lover, you can even add a pinch of cayenne pepper. Just be careful, a little goes a long way! Another fun twist? Use a flavored olive oil, like chili-infused olive oil, in the dough for an extra layer of heat. These spicy garlic bread rolls are amazing with pasta or as a side for grilled meats. Just be sure to warn your guests they’ve got a bit of a zing!
Serving Suggestions for Garlic Bread Rolls
Garlic Bread Rolls as a Side Dish
Okay, let’s get real – these garlic bread rolls are pretty amazing on their own, but they *really* shine as a side dish! My absolute favorite pairing? A big bowl of spaghetti with marinara sauce. Seriously, is there anything better than twirling pasta and then soaking up that extra sauce with a warm, garlicky roll? I think not!
They’re also incredible with soups – think creamy tomato soup, hearty minestrone, or even a simple chicken noodle. And don’t forget salads! A few warm garlic bread rolls alongside a crisp Caesar or a bright Caprese salad? Yes, please! They add that perfect touch of comfort and carbs to balance out the freshness. Basically, anything that needs a little extra something-something, these rolls are your answer!
Garlic Bread Rolls as an Appetizer
Want to impress your guests before the main course even arrives? These garlic bread rolls make a fantastic appetizer! Just arrange them on a pretty platter and serve them with some yummy dips. My go-to is a classic marinara sauce (warmed up, of course!), but you can also get creative. Think creamy spinach and artichoke dip, roasted red pepper hummus, or even a simple olive oil and balsamic vinegar mixture for dipping.
Another fun idea? Slice the rolls in half and top them with bruschetta-style toppings – diced tomatoes, basil, garlic, and a drizzle of balsamic glaze. Talk about a crowd-pleaser! And if you’re feeling extra fancy, you can even serve them alongside a cheese board. The warm, garlicky flavor pairs perfectly with all sorts of cheeses. Trust me, these garlic bread rolls will disappear in minutes!
Storing and Reheating Your Garlic Bread Rolls
Storing Leftover Garlic Bread Rolls
Okay, so you’ve somehow managed *not* to eat all the garlic bread rolls in one sitting? Impressive! Here’s how to keep them fresh. If you’re planning on eating them within a day or two, just store them at room temperature in an airtight container or a zip-top bag. Make sure they’re completely cooled first, or they’ll get soggy. For longer storage (up to a week), pop them in the fridge. And if you want to keep them even longer? The freezer is your friend! Wrap them tightly in plastic wrap, then place them in a freezer bag. They’ll keep for up to 2-3 months. Just remember to label the bag with the date so you don’t forget!
Reheating Garlic Bread Rolls for Best Results
Alright, let’s bring these babies back to life! My favorite method? The oven, hands down. Preheat your oven to 350°F (175°C), wrap the garlic bread rolls in foil (this prevents them from drying out), and bake for about 10-15 minutes, or until heated through. If they’re frozen, you can bake them straight from the freezer, but you’ll need to add a few extra minutes.
If you’re short on time, the microwave will do in a pinch. Just wrap the roll in a damp paper towel and microwave for about 20-30 seconds. But be careful – microwaving can make them a little rubbery, so don’t overdo it! And for a super crispy exterior, try the air fryer! Preheat it to 350°F (175°C) and air fry for about 3-5 minutes, or until heated through and crispy. Just keep an eye on them, because air fryers can vary!
FAQs About Making Garlic Bread Rolls
Can I use store-bought dough for Garlic Bread Rolls?
Okay, so you’re short on time? I get it! Yes, you *can* totally use store-bought dough for these garlic bread rolls. Pizza dough or even those canned biscuit doughs work in a pinch. But honestly? The flavor won’t be quite as amazing as homemade. If you go this route, just make sure to let the dough come to room temperature before shaping the rolls. And don’t skimp on that glorious garlic butter! It’ll help make up for the lack of homemade flavor.
How do I make Garlic Bread Rolls ahead of time?
Planning a party? Smart move! You can definitely prep these garlic bread rolls in advance. You’ve got a couple of options. You can make the dough, let it rise, shape the rolls, and then refrigerate them *before* the second rise. When you’re ready to bake, just take them out of the fridge and let them rise for about an hour before baking as directed. Or, you can bake the rolls completely, let them cool, and then freeze them. When you’re ready to serve, just reheat them in the oven. Easy peasy!
What’s the best way to get the garlic flavor into Garlic Bread Rolls?
Alright, let’s talk garlic! The key is to use *fresh* garlic, minced finely. I like to use a garlic press, but you can also chop it by hand. And don’t be shy – use plenty! Letting the garlic butter sit for about 15 minutes before brushing it on the rolls really helps the garlic flavor infuse into the butter. Oh, and don’t forget the garlic powder! It adds an extra layer of garlicky goodness. Trust me, these garlic bread rolls will be bursting with flavor!
Estimated Nutritional Information for Garlic Bread Rolls
Okay, so let’s talk numbers (but don’t worry, I’m not gonna get all boring on you!). Keep in mind, this is just an estimate, because it can vary depending on the exact ingredients you use and how big you make your rolls. But roughly, one garlic bread roll will give you:
- Calories: Around 200-250
- Fat: About 10-15 grams
- Protein: Roughly 4-6 grams
- Carbs: Somewhere in the neighborhood of 25-35 grams
Yeah, they’re not exactly health food, but hey, everything in moderation, right? And trust me, they’re *so* worth it! Now go bake some amazing garlic bread rolls!
Make Your Own Amazing Garlic Bread Rolls Today!
Okay, friends, that’s it! You’ve got all the secrets to making the *best* garlic bread rolls EVER. Seriously, I’m so excited for you to try this recipe! It’s a total game-changer, and I just know you’re gonna love it.
So, what are you waiting for? Grab those ingredients, preheat that oven, and get ready to bake some magic! And hey, when you do make these, promise me you’ll snap a picture and share it with me? Tag me on [Social Media Handle] – I can’t wait to see your creations! Happy baking, and remember – life’s too short for boring bread!
Print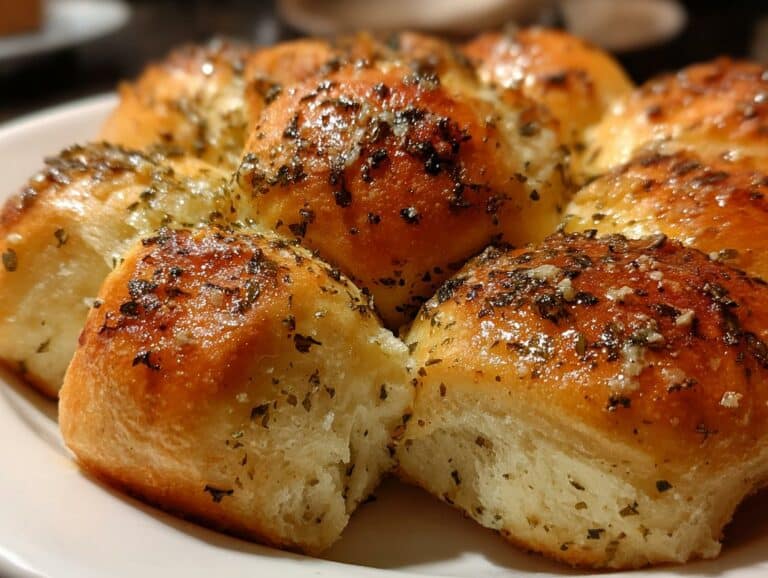
Garlic Bread Rolls: The Easiest Recipe Never Fails
Moist and delicious chocolate chip zucchini bread, a perfect quick bread for any occasion. This recipe is easy to make, family-friendly, and a great way to use up fresh zucchini.
- Total Time: 1 hour 15 minutes
- Yield: 1 loaf 1x
Ingredients
- 2 cups all-purpose flour
- 1 teaspoon baking soda
- 1/2 teaspoon salt
- 1 teaspoon ground cinnamon
- 1/4 teaspoon ground nutmeg
- 1 1/2 cups granulated sugar
- 2 large eggs
- 3/4 cup vegetable oil
- 1 teaspoon vanilla extract
- 2 cups grated zucchini (about 2 medium zucchinis, ends trimmed)
- 1 cup chocolate chips
Instructions
- Preheat your oven to 350°F (175°C). Grease and flour a 9×5 inch loaf pan.
- In a large bowl, whisk together the flour, baking soda, salt, cinnamon, and nutmeg.
- In a separate bowl, whisk together the sugar, eggs, vegetable oil, and vanilla extract.
- Add the wet ingredients to the dry ingredients and mix until just combined. Do not overmix.
- Gently fold in the grated zucchini and chocolate chips.
- Pour the batter into the prepared loaf pan and spread evenly.
- Bake for 50-60 minutes, or until a wooden skewer inserted into the center comes out clean.
- Let the bread cool in the pan for 10 minutes before transferring it to a wire rack to cool completely.
Notes
- Ensure your zucchini is well-drained after grating to prevent a soggy loaf.
- You can add chopped nuts like walnuts or pecans for extra texture.
- For dairy-free, use a dairy-free milk alternative if needed, though this recipe does not require milk.
- This bread freezes well. Wrap tightly once completely cooled.
- Prep Time: 15 minutes
- Cook Time: 60 minutes
- Category: Quick Bread
- Method: Baking
- Cuisine: American
- Diet: Vegetarian
Nutrition
- Serving Size: 1 slice
- Calories: 350
- Sugar: 30g
- Sodium: 250mg
- Fat: 18g
- Saturated Fat: 5g
- Unsaturated Fat: 13g
- Trans Fat: 0g
- Carbohydrates: 45g
- Fiber: 2g
- Protein: 4g
- Cholesterol: 40mg