 Skip to content
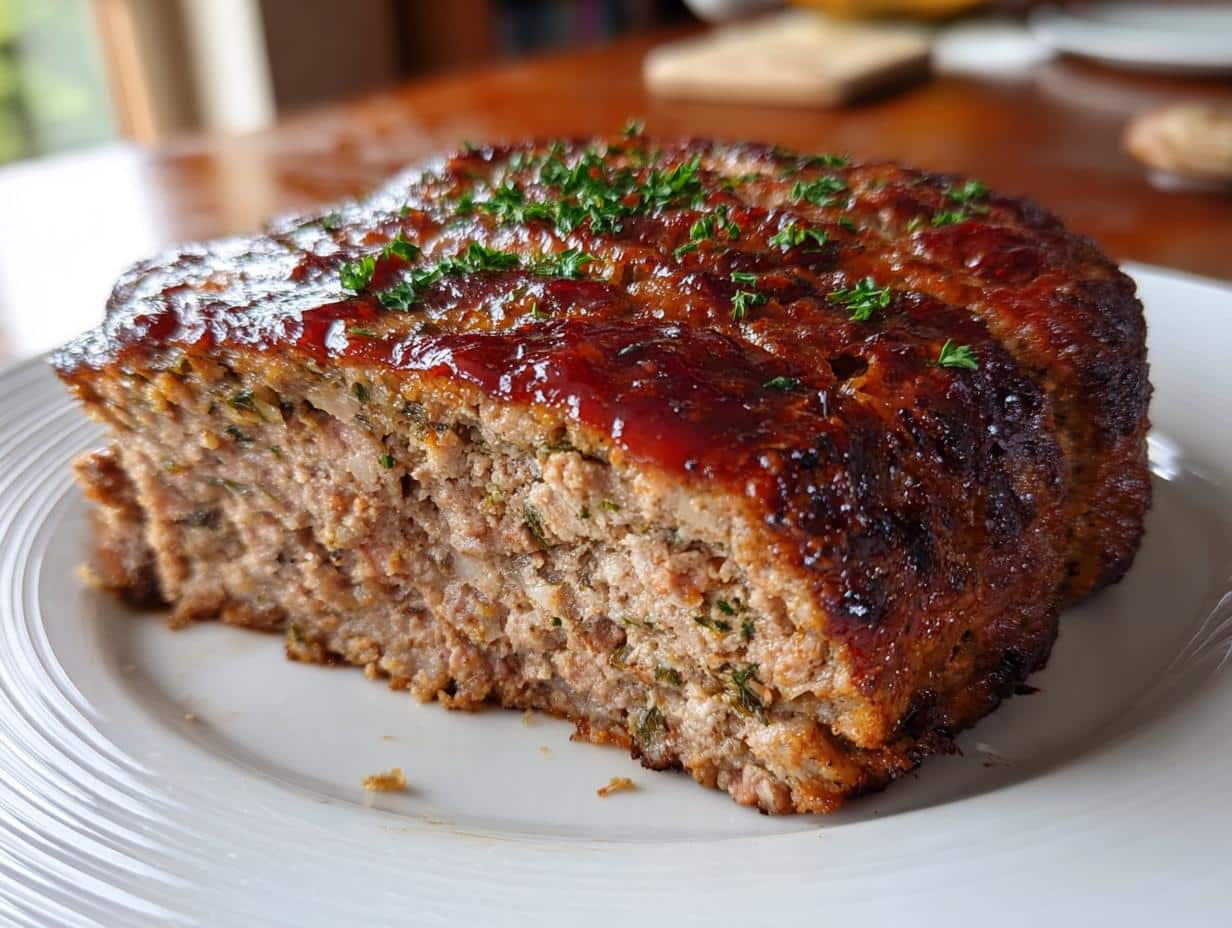
Okay, friends, let’s talk meatloaf! Not just any meatloaf, but a Flavor-Packed Meatloaf that’ll have everyone asking for seconds. I know, I know, meatloaf can sometimes get a bad rap, conjuring up images of dry, bland dinners. But trust me, this recipe? It’s a total game-changer. It’s the kind of dish my granny would have made, packed with flavor and love, but with a few of my own twists thrown in!
Growing up in Galway, meatloaf wasn’t exactly a staple, but hearty, comforting food was! And this recipe combines that cozy vibe with simple, fresh ingredients. Remember those family dinners around the fire? Well, one bite of this, and you’re practically there! I spent years tweaking this recipe, and I think I’ve finally nailed the perfect balance of juicy, savory, and just plain delicious. So, ditch those meatloaf memories of the past, and get ready for a flavor explosion!
Why You’ll Love This Flavor-Packed Meatloaf Recipe
Quick and Easy Flavor-Packed Meatloaf
Look, I get it. Weeknights are hectic! That’s why I designed this Flavor-Packed Meatloaf to be super speedy. Forget spending hours in the kitchen – from start to finish, you’re looking at maybe an hour, tops! And most of that is just letting the oven do its thing. Minimal chopping, simple mixing, and boom – dinner is served! Seriously, even on the busiest days, you can totally pull this off. It’s way easier than ordering takeout, and a whole lot tastier, too!
Incredibly Flavorful Flavor-Packed Meatloaf
Okay, this is where the magic happens. We’re not talking about your grandma’s bland meatloaf here (sorry, Grandma!). This recipe is bursting with flavor from a carefully chosen blend of veggies, herbs, and spices. My favorite part is the little kick from the Worcestershire sauce – it just adds that *something*. Don’t be shy – play around with the seasonings and make it your own! Trust me, every bite is an explosion of savory goodness.
Perfect for Meal Prepping Flavor-Packed Meatloaf
Meal prepping is my secret weapon for surviving the week, and this Flavor-Packed Meatloaf is perfect for it! You can totally make it ahead of time – just wrap it up tight and pop it in the fridge. Then, when you’re ready to eat, just slice it up and reheat. It’s even great cold in sandwiches (seriously, try it!). Plus, it tastes even better the next day as the flavors meld together. Prepare for some seriously easy and delicious lunches!
Ingredients for the Best Flavor-Packed Meatloaf
Meat
Alright, let’s get meaty! You’ll want 1 pound of ground beef. I usually go for an 80/20 blend – that means 80% lean beef and 20% fat. That little bit of fat is *key* for keeping your Flavor-Packed Meatloaf nice and juicy, trust me! If you go too lean, it can dry out a bit.
Vegetables
Veggies are where we sneak in some extra flavor and moisture! You’ll need 1/2 cup of diced onion (yellow or white, whatever you’ve got!). Also, grab 1/4 cup of minced bell pepper. Red, green, orange, yellow – pick your favorite, or mix ’em up for some color! Just make sure everything’s diced nice and small so it cooks evenly.
Binders
To hold our Flavor-Packed Meatloaf together, we need some binders. Reach for 1/2 cup of plain breadcrumbs. I usually use the regular kind, but you can totally use gluten-free if you need to! And don’t forget 1 large egg – it’s like the glue that keeps everything in place.
Seasonings
Now for the fun part – flavor city! You’ll want 1 tablespoon of Worcestershire sauce. That stuff is liquid magic, I swear! Then, add 1 teaspoon of garlic powder (because garlic makes everything better, right?). And finally, 1/2 teaspoon of dried thyme. If you’ve got fresh thyme, even better – just use about a tablespoon, chopped fine.
Topping
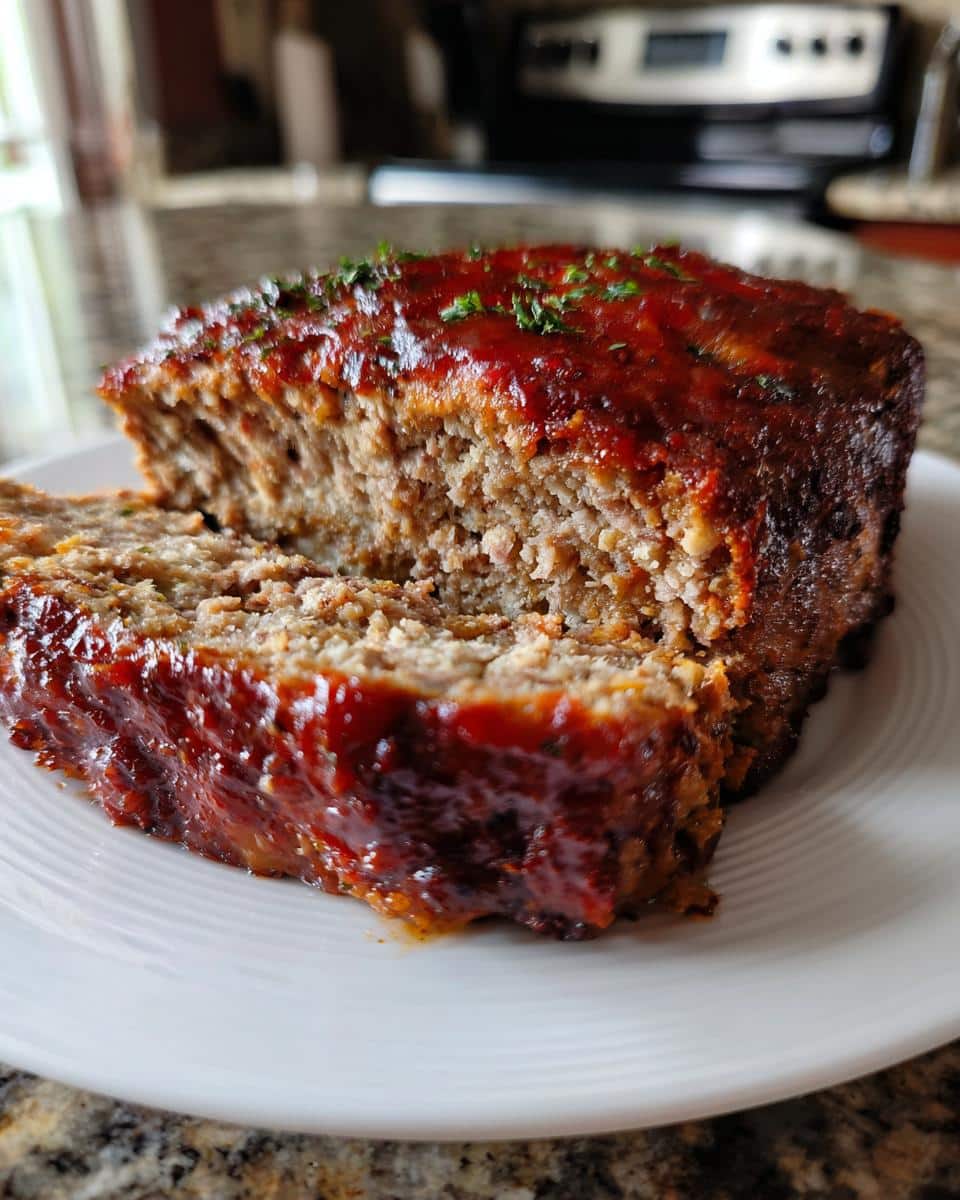
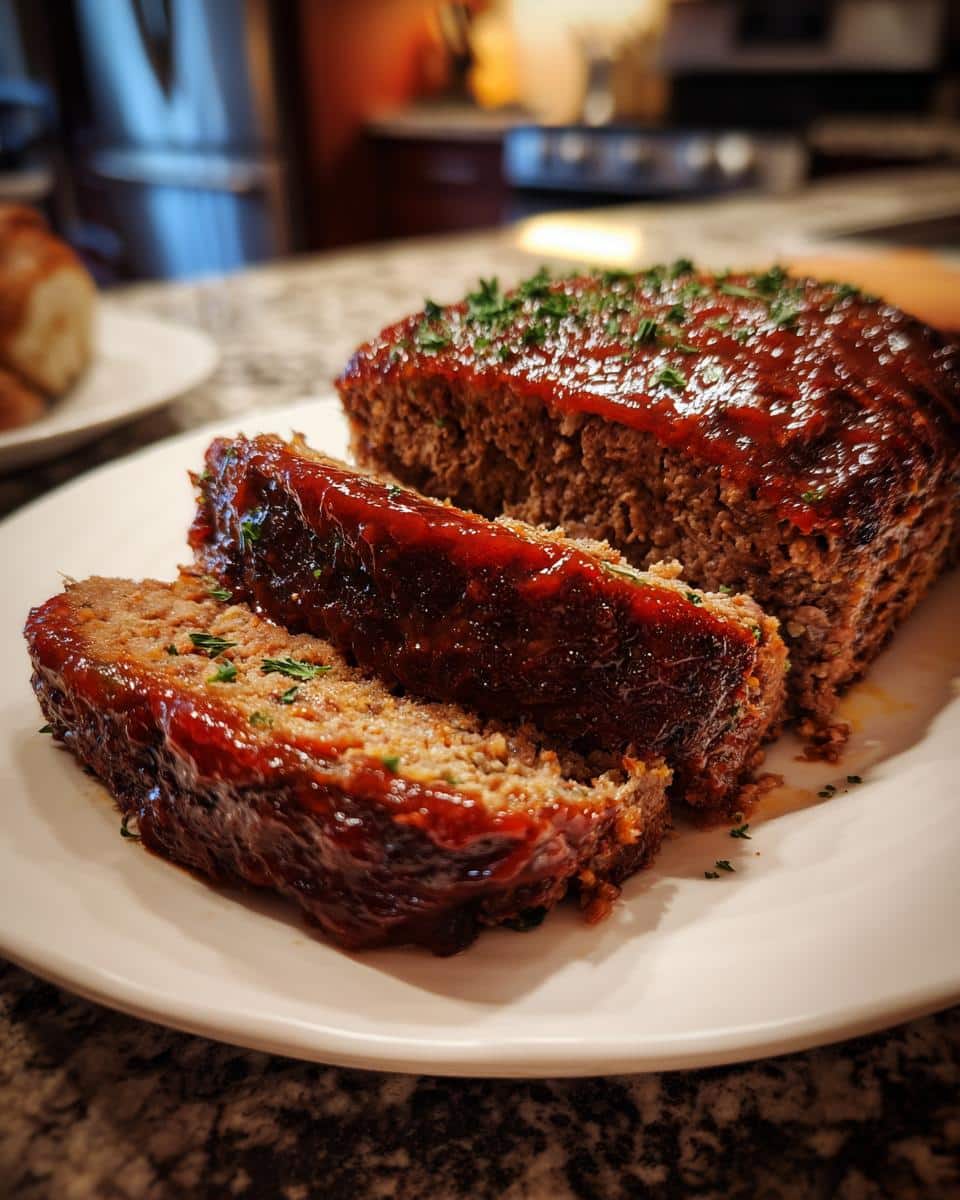
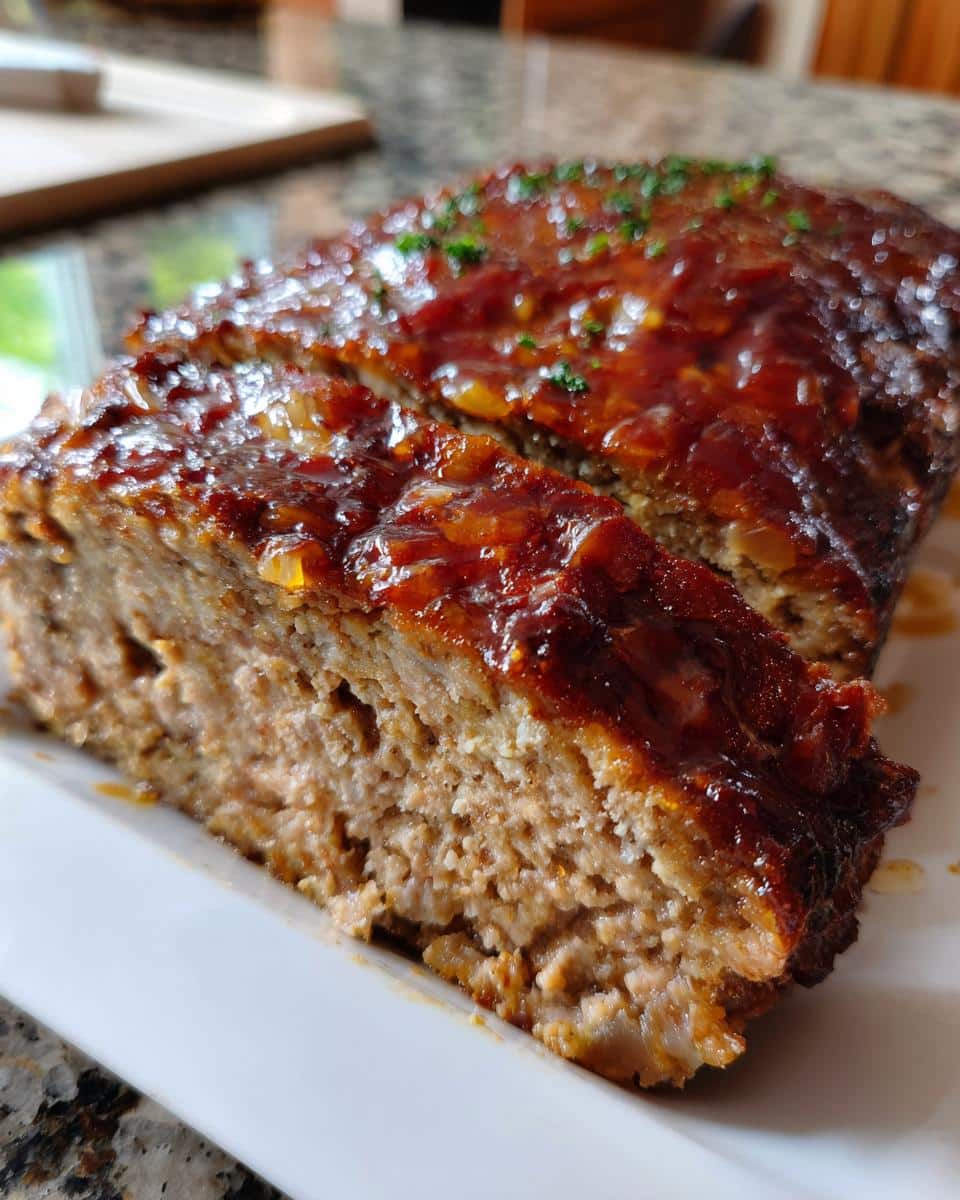
Let’s not forget the sweet and tangy topping! You’ll need 1/2 cup of ketchup (the classic!). Mix that with 1 tablespoon of brown sugar (packed, for extra sweetness!). And a teaspoon of mustard. Yellow, Dijon, even a little spicy brown – whatever floats your boat! This glaze gives the Flavor-Packed Meatloaf a beautiful finish and a little extra zing!
How to Make Flavor-Packed Meatloaf: Step-by-Step Instructions
Preparing the Meat Mixture
Alright, gather ’round, because it’s mixing time! In a big bowl (and I mean *big* – you’ll need the space!), gently combine your ground beef, diced onion, minced bell pepper, breadcrumbs, egg, Worcestershire sauce, garlic powder, and thyme. Now, here’s the secret: don’t overmix! Seriously, I can’t stress this enough. Overmixing makes the meat tough, and nobody wants a tough Flavor-Packed Meatloaf. Just use your hands (or a spoon if you prefer) to lightly combine everything until it’s *just* mixed. A few streaks of breadcrumbs are totally fine!
Shaping the Flavor-Packed Meatloaf
Okay, now it’s time to get your hands dirty again! Gently shape the meat mixture into a loaf. You can either do this right on a baking sheet – just make sure to line it with parchment paper for easy cleanup – or you can use a loaf pan. If you’re using a loaf pan, I recommend leaving a little space around the sides so the heat can circulate. Either way, try to make the loaf as even as possible so it cooks evenly. I usually aim for something around 9×5 inches, but don’t stress too much about being perfect!
Baking the Flavor-Packed Meatloaf
Before we even *think* about baking, make sure you preheat your oven to 350°F (175°C). Preheating is super important for even cooking! Once the oven’s ready, pop your Flavor-Packed Meatloaf in and bake for about 50-60 minutes. Now, here’s a pro tip: use a meat thermometer! Stick it into the center of the loaf, and when it reads 160°F (71°C), you know it’s done. If you don’t have a thermometer, no worries – just cut into the center. If the juices run clear, you’re good to go!
Adding the Topping
Almost there! In a small bowl, whisk together your ketchup, brown sugar, and mustard. Once the meatloaf has baked for about 45 minutes, pull it out of the oven and spread that glorious topping all over it. Then, pop it back in for the last 10-15 minutes to let the topping caramelize and get all sticky and delicious. If you’re feeling fancy, you can even broil it for the last minute or two – just keep a close eye on it, because it can burn quickly! We’re going for golden brown and bubbly, not charcoal!
Resting and Slicing
Patience, my friend, patience! Once the Flavor-Packed Meatloaf is out of the oven, it’s *crucial* to let it rest for at least 10 minutes before slicing. I know, it’s tempting to dig right in, but trust me, resting allows the juices to redistribute, resulting in a much juicier and more flavorful meatloaf. If you slice it too soon, all those juices will run out, and you’ll end up with a dry-ish meatloaf. So, grab a drink, relax, and let the magic happen! When it’s rested, slice it up and serve. Enjoy!
Ingredient Notes and Substitutions for Your Flavor-Packed Meatloaf
Meat Substitutions
Okay, so maybe you’re not a beef person, or you’re just trying to mix things up! No problem! You can totally swap out the ground beef in this Flavor-Packed Meatloaf for ground turkey or chicken. Just keep in mind that turkey and chicken tend to be a bit drier than beef, so you might want to add a tablespoon or two of olive oil to the mixture to keep it juicy. And hey, if you’re going plant-based, there are some great ground meat alternatives out there these days! Just make sure to check the package instructions for any special cooking tips.
Binder Substitutions
Breadcrumbs are classic, but if you’re gluten-free or just out of breadcrumbs (oops!), don’t panic! You can easily substitute them with gluten-free breadcrumbs, of course. But rolled oats also work like a charm! Just pulse them in a food processor (or even a blender!) until they’re finely ground. You can even use crushed crackers in a pinch – Ritz crackers add a surprisingly delicious buttery flavor! Just use the same amount as you would breadcrumbs, and you’re good to go!
Vegetable Variations
Get creative with your veggies! Not a fan of bell peppers? No problem! Try dicing up some carrots, celery, or even zucchini. Mushrooms are also a fantastic addition – they add a lovely earthy flavor. The key is to keep the total amount of veggies roughly the same (about 3/4 cup), and make sure everything’s diced nice and small so it cooks evenly. Don’t be afraid to experiment – you might just discover your new favorite Flavor-Packed Meatloaf combo!
Seasoning Swaps
This is where you can really let your personality shine! Not feeling the thyme? Try oregano, basil, or even a little rosemary. A pinch of red pepper flakes will add a nice kick, if you’re into that sort of thing! And if you’re a garlic lover (like me!), feel free to add an extra clove or two of minced garlic. You can also play around with different types of mustard in the topping – Dijon mustard adds a bit of tang, while spicy brown mustard brings the heat. The possibilities are endless, so have fun and make it your own!
Tips for the Perfect Flavor-Packed Meatloaf
Don’t Overmix the Meat
Seriously, I can’t say this enough! Overmixing is the *enemy* of a juicy, tender Flavor-Packed Meatloaf. When you overmix, you develop the gluten in the meat, which makes it tough and dense. Think hockey puck, not delicious dinner! So, be gentle! Just lightly combine the ingredients until they’re *barely* mixed. A few streaks of breadcrumbs? Totally fine! Trust me, your meatloaf will thank you.
Use a Meat Thermometer
Okay, if you want to take your Flavor-Packed Meatloaf game to the next level, invest in a meat thermometer. Seriously, it’s a game changer! It takes all the guesswork out of baking. Just stick it in the center of the loaf, and when it reads 160°F (71°C), you know it’s perfectly cooked. No more dry, overcooked meatloaf! Plus, you’ll have peace of mind knowing it’s safe to eat. Win-win!
Let the Flavor-Packed Meatloaf Rest
Patience, my friend, patience! I know it’s tempting to slice into that Flavor-Packed Meatloaf as soon as it comes out of the oven, but resist! Letting it rest for at least 10 minutes – or even longer – allows the juices to redistribute, resulting in a much juicier and more flavorful meatloaf. If you skip this step, all those delicious juices will run out, leaving you with a drier meatloaf. Trust me, the wait is worth it!
Customize Your Topping
Okay, the ketchup topping is classic for a reason, but don’t be afraid to get creative! If you’re a BBQ sauce fan, try using that instead! Or how about a balsamic glaze for a little sophistication? You could even mix some brown sugar and Dijon mustard for a sweet and tangy kick. The possibilities are endless! So, raid your fridge and pantry and see what delicious concoctions you can come up with to top your Flavor-Packed Meatloaf!
FAQ About Making Flavor-Packed Meatloaf
How do I keep my Flavor-Packed Meatloaf from being dry?
Ah, the age-old question! Nobody wants a dry meatloaf, right? The key is moisture, moisture, moisture! Make sure you’re using ground beef with a little bit of fat (80/20 is my go-to). Also, don’t skimp on the veggies – they release moisture as they cook. And most importantly, don’t overcook it! Use a meat thermometer to ensure it’s cooked through but still juicy. Oh, and letting it rest after baking? Super important!
Can I make Flavor-Packed Meatloaf ahead of time?
You betcha! Make ahead meatloaf is a lifesaver on busy weeknights. You can totally assemble the meatloaf, wrap it tightly in plastic wrap, and store it in the fridge for up to 24 hours before baking. When you’re ready to bake, just pop it in the oven and follow the recipe instructions. You might need to add a few extra minutes to the baking time since it’s starting out cold. Easy peasy!
What is the best internal temperature for Flavor-Packed Meatloaf?
Safety first, folks! You want to make sure your flavorful meatloaf is cooked to a safe internal temperature of 160°F (71°C). That’s the magic number! Use a meat thermometer to check the temperature in the center of the loaf. Once it hits 160°F, you know it’s cooked through and safe to eat. But remember, don’t overcook it, or it’ll be dry!
What are some good side dishes to serve with Flavor-Packed Meatloaf?
Oh, the possibilities are endless! Buttery mashed potatoes and gravy are a classic for a reason. Roasted vegetables are always a win – think carrots, potatoes, and Brussels sprouts. A simple green salad adds a nice bit of freshness. Or how about some creamy mac and cheese? Comfort food heaven! Honestly, anything goes – just pick your favorites and dig in!
Serving Suggestions for Your Flavor-Packed Meatloaf
Classic Sides
Okay, let’s talk sides! You can’t go wrong with the classics when it comes to Flavor-Packed Meatloaf. I’m talking creamy, dreamy mashed potatoes with a generous ladle of gravy. Seriously, is there anything more comforting? And don’t forget the green beans! Either steamed or sautéed with a little garlic and butter. It’s the perfect trifecta of comfort food goodness!
Salad Options
If you’re looking to lighten things up a bit, a salad is a great option. A classic Caesar salad with crisp romaine lettuce, crunchy croutons, and a creamy dressing is always a winner. Or, go for a simple garden salad with mixed greens, tomatoes, cucumbers, and your favorite vinaigrette. It’s a refreshing counterpoint to the richness of the Flavor-Packed Meatloaf.
Vegetable Pairings
Want to keep the veggie train going? Roasted vegetables are always a good idea! Think carrots, potatoes, Brussels sprouts, or even sweet potatoes. Just toss them with a little olive oil, salt, pepper, and your favorite herbs, and roast them until they’re tender and caramelized. Or, go for steamed broccoli with a squeeze of lemon juice. Simple, healthy, and delicious!
Nutritional Information
Just a quick little note: the nutritional information for this Flavor-Packed Meatloaf can vary quite a bit depending on the specific ingredients you use (like the brand of ground beef or ketchup). So, I’m not providing precise numbers here. If you need exact nutritional info, I recommend using a nutrition calculator and plugging in the specific brands and amounts you use in your recipe. Happy cooking!
Enjoy Your Delicious Flavor-Packed Meatloaf!
And there you have it, friends! A Flavor-Packed Meatloaf that’s sure to become a family favorite. I really hope you give this recipe a try – I just know you’re going to love it! And hey, if you do, I’d absolutely *love* to hear about it! Leave a comment below and let me know how it turned out. Did you make any fun substitutions? What did you serve it with? I’m all ears!
Oh, and if you’re feeling extra generous, a five-star rating would totally make my day! Plus, it helps other folks find this recipe too. And last but not least, don’t forget to share your meatloaf masterpieces on social media! Tag me so I can see your creations. Happy cooking, everyone!
Print
Flavor-Packed Meatloaf: Ditch Dryness With 5 Secrets
A comforting and indulgent dish that combines spaghetti and garlic bread into one delicious bake. Perfect for a weeknight dinner or a crowd-pleasing meal.
- Total Time: 40 minutes
- Yield: 6-8 servings 1x
Ingredients
- 1 pound spaghetti
- 1/2 cup butter, melted
- 4 cloves garlic, minced
- 1/4 cup chopped fresh parsley
- 1/4 teaspoon salt
- 1/4 teaspoon black pepper
- 2 cups shredded mozzarella cheese
- 1 cup shredded cheddar cheese
- 1/2 cup grated Parmesan cheese
- 1/4 cup milk
Instructions
- Preheat your oven to 375°F (190°C). Grease a 9×13 inch baking dish.
- Cook spaghetti according to package directions. Drain well.
- In a small bowl, combine melted butter, minced garlic, chopped parsley, salt, and pepper.
- In a large bowl, toss the drained spaghetti with the garlic butter mixture.
- Stir in 1 cup of mozzarella cheese, 1/2 cup of cheddar cheese, and 1/4 cup of Parmesan cheese.
- Pour the spaghetti mixture into the prepared baking dish.
- In a separate bowl, combine the remaining 1 cup mozzarella cheese, 1/2 cup cheddar cheese, and 1/4 cup Parmesan cheese. Sprinkle evenly over the spaghetti.
- Pour the milk over the cheese layer.
- Bake for 20-25 minutes, or until the cheese is melted and bubbly and the edges are golden brown.
- Let it stand for a few minutes before serving.
Notes
- For extra garlic flavor, you can add another clove of minced garlic to the butter mixture.
- Feel free to add your favorite herbs like basil or oregano to the garlic butter.
- If you like a crispier topping, you can broil the dish for the last 1-2 minutes, watching carefully to prevent burning.
- This dish can be made ahead of time and reheated. Cover with foil and bake at 350°F (175°C) until heated through.
- Prep Time: 15 minutes
- Cook Time: 25 minutes
- Category: Main Course
- Method: Baking
- Cuisine: Italian-American
- Diet: Vegetarian
Nutrition
- Serving Size: 1 serving
- Calories: 550
- Sugar: 5g
- Sodium: 600mg
- Fat: 30g
- Saturated Fat: 15g
- Unsaturated Fat: 15g
- Trans Fat: 0g
- Carbohydrates: 50g
- Fiber: 3g
- Protein: 20g
- Cholesterol: 70mg