 Skip to content
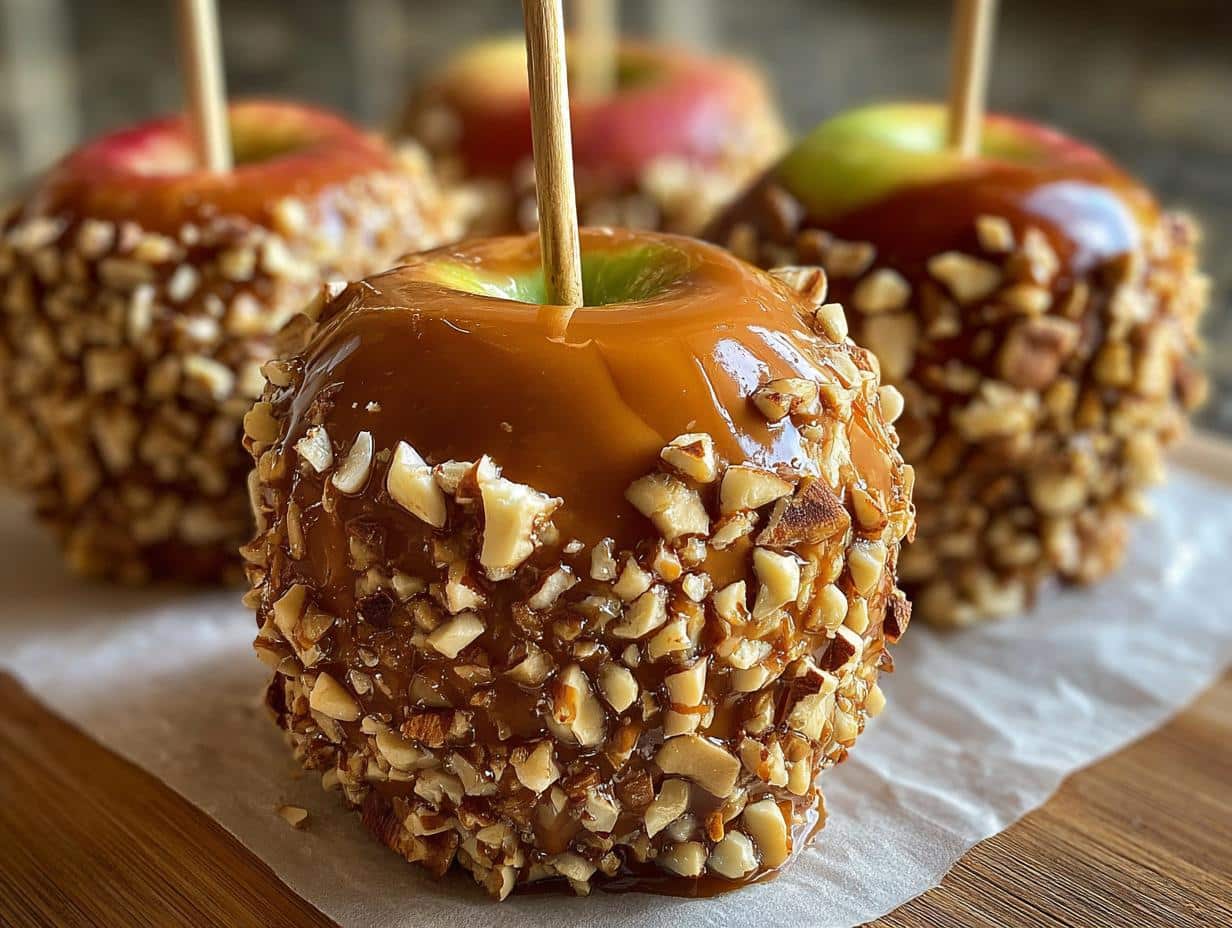
Okay, friends, gather ’round because I’m about to share my super-easy (and seriously yummy) caramel apple recipe! Now, I know what you might be thinking: “Caramel apples? Too much work!” But trust me, this recipe is so simple, even my granny (who, bless her heart, could burn water) could nail it. And that’s saying something, let me tell you!
You know, growing up in Galway, Ireland, we didn’t exactly have Halloween the way you do here. But we *did* have apple season, and that meant Granny Thompson’s kitchen was overflowing with the sweet scent of cinnamon and whatever deliciousness she was whipping up. These caramel apples? They’re inspired by those cozy autumn days, with a little modern twist for us busy bees. I promise, you’ll be amazed at how easy it is to make these gorgeous caramel apples right at home. Let’s get started!
Why You’ll Love These Caramel Apples
Seriously, you’re gonna be obsessed! Here’s why:
Quick and Easy Caramel Apple Recipe
Forget spending hours in the kitchen! This recipe is so straightforward, you can whip up a batch of these in under an hour. Perfect for when you need a sweet treat, like, *yesterday*.
Perfect Fall Treat: Caramel Apples
Is there anything that screams “fall” more than a caramel apple? I think not! These are perfect for Halloween parties, Thanksgiving desserts, or just a cozy night in. The autumn vibes are strong with this one!
Customizable Caramel Apples for Everyone
Nuts? Sprinkles? Chocolate chips? Go wild! The best part about these caramel apples is that you can totally customize them to your heart’s content. Make ’em fancy, make ’em fun – it’s all up to you!
Homemade Caramel Apples Taste Better!
Okay, I know it sounds cliché, but it’s true! Store-bought caramel apples just don’t compare to the taste of fresh caramel and crisp apples made with love (and this easy recipe!). Trust me on this one!
Ingredients for the Best Caramel Apples
Alright, let’s talk ingredients! This is where the magic happens, and trust me, using good stuff makes ALL the difference. Don’t skimp – you deserve the best caramel apples EVER!
Apples
You’ll want 6 medium apples. Now, Granny Smiths are my go-to because they’re nice and tart, which balances the sweetness of the caramel perfectly. But honestly? Honeycrisp apples are amazing too – super crisp and juicy! Just pick your favorite, but make sure they’re firm, okay?
Wooden Sticks
Grab 6 wooden sticks – the kind you’d use for lollipops or corn dogs. You want them sturdy enough to hold the weight of the apple and caramel, so don’t go too thin. About 4-6 inches long is perfect.
Caramels
You’re gonna need 14 ounces of caramels. I usually buy the Kraft ones ’cause they melt so nicely, but any brand will do. And, HUGE tip: make sure they’re unwrapped *before* you start melting them. Trust me, you don’t want to be wrestling with those little wrappers when the caramel’s hot!
Milk
Just 2 tablespoons of milk. Any kind works – whole, 2%, even skim if that’s what you’ve got. It just helps the caramel melt smoothly and keeps it from getting too thick. Don’t skip it!
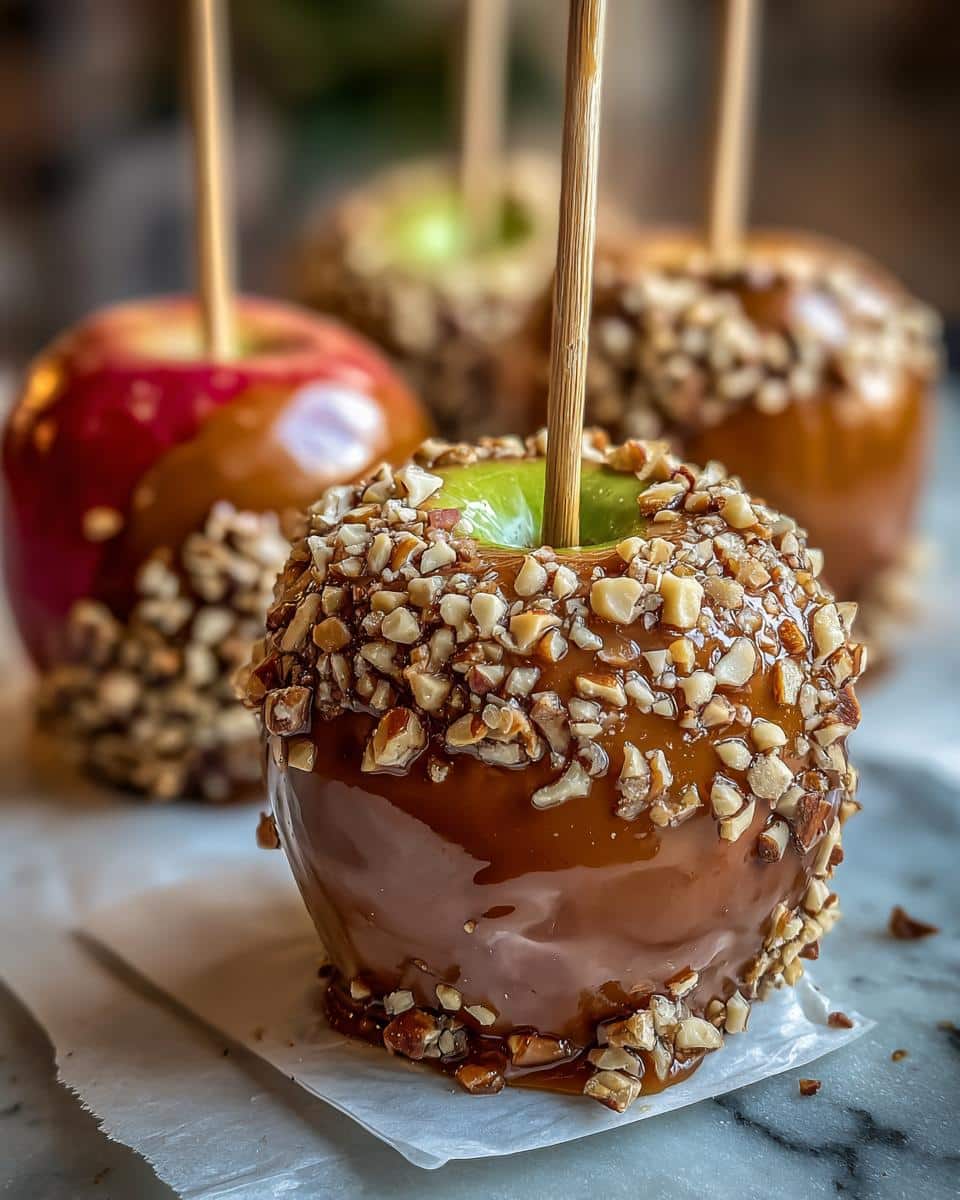
Optional Toppings for Caramel Apples
This is where you can really get creative! I love having a mix of chopped nuts (pecans, walnuts, peanuts – yum!), colorful sprinkles (because who doesn’t love sprinkles?), and mini chocolate chips. But seriously, the sky’s the limit here! Pretzels, crushed Oreos, toffee bits… go wild!
How to Make Caramel Apples: Step-by-Step Instructions
Okay, friends, now for the fun part! Follow these steps, and you’ll have gorgeous caramel apples in no time. Don’t worry if you mess up a little – that’s half the fun, right?
Prepare the Apples for Caramel Apple Dipping
First things first, give those apples a good scrub under cold water. Get rid of any wax or, you know, whatever else might be lurking on there. Then, DRY them *completely*. I’m serious – use a clean towel and make sure there’s no moisture left. This is super important because the caramel won’t stick to a wet apple. I usually let them air dry for, like, 15 minutes just to be extra sure. Once they’re bone dry, shove a wooden stick firmly into the stem end of each apple. Boom! Ready to go!
Melt the Caramel for Caramel Apples
Now, grab a microwave-safe bowl and dump in all those unwrapped caramels. Add the milk. Pop it in the microwave on medium power (that’s about 50% power on most microwaves, just FYI). Microwave in 30-second intervals, and I mean *30 seconds*, people! Take it out and give it a good stir after each interval. This keeps the caramel from burning. Keep microwaving and stirring until the caramel is completely melted and smooth. It should be nice and pourable. This usually takes me about 2-3 minutes total, but keep an eye on it! For more tips on melting ingredients, check out this ice water hack recipe.
Dip Apples in Caramel
Time to get dipping! Now, here’s a little trick I learned the hard way: use a tall, narrow bowl for the melted caramel. It makes it SO much easier to coat the apples evenly. Trust me on this one! Hold an apple by the stick and dip it into the caramel, turning it to coat completely. Let the excess caramel drip off back into the bowl. Work quickly, because the caramel will start to set as it cools.
Add Toppings to Your Caramel Apples
Right after dipping, sprinkle on your toppings! Do this immediately, while the caramel is still warm and gooey. Otherwise, the toppings won’t stick. I like to put my toppings in shallow bowls so I can just roll the caramel apple in them. It’s less messy that way! Have fun with it – get creative!
Chill the Caramel Apples
Finally, place the caramel-coated apples on a baking sheet lined with parchment paper (this keeps them from sticking). Pop them in the fridge for at least 30 minutes to let the caramel set completely. And that’s it! You’ve got gorgeous, homemade caramel apples! Aren’t you proud of yourself?
Tips for Perfect Caramel Apples
Want your caramel apples to be total showstoppers? Of course, you do! Here are a few little secrets I’ve learned along the way to make sure they’re absolutely perfect:
Ensuring Caramel Adheres to Caramel Apples
I can’t stress this enough: the drier the apple, the better the caramel will stick! If there’s even a tiny bit of moisture, the caramel will slide right off. Pat those apples dry like they owe you money!
Preventing Sticky Caramel Apples
Nobody likes a sticky mess! Keep your caramel apples in the fridge until you’re ready to serve them. The cold helps the caramel stay firm and prevents it from getting all melty and gooey. Trust me, it makes a difference!
Easy Caramel Apple Dipping
Remember that tall, narrow bowl I mentioned? It’s a game-changer! It ensures the caramel coats the entire apple evenly without you having to do any crazy acrobatics. Plus, less caramel waste! Win-win!
Caramel Apple Variations: Get Creative!
Okay, so you’ve mastered the basic caramel apple. Now it’s time to unleash your inner artist! Seriously, the possibilities are endless. Let’s get those creative juices flowing, shall we?
Gourmet Caramel Apple Toppings
Forget the sprinkles (okay, maybe don’t *forget* them, but level up!). Think chopped pecans and a drizzle of dark chocolate. Or crushed pretzels for that sweet-and-salty thing. Toffee bits? YES, PLEASE! Get fancy with some sea salt flakes. Ooh, or even candied bacon bits for the adventurous!
Flavored Caramel Apples
Want to take your caramel to the next level? Stir a teaspoon of vanilla extract into the melted caramel for a classic twist. Or how about a dash of cinnamon for that cozy fall feeling? A little almond extract? Wow! Just be careful not to add too much liquid, or it’ll mess with the caramel’s consistency. A little goes a long way!
Caramel Apple Bark
Oops! Did you make too much caramel? Don’t worry, it happens! Just pour it onto a parchment-lined baking sheet, spread it out thin, and sprinkle with chopped apples and your favorite toppings. Let it cool completely, then break it into pieces. Voila! Caramel apple bark! It’s like a caramel apple, but, you know, *easier* to eat. And just as addictive!
Serving Suggestions for Your Caramel Apples
Alright, so you’ve got these beautiful caramel apples… now what? Here are a couple of ideas to really make ’em shine!
Pair Caramel Apples with Warm Drinks
Seriously, is there anything better than a warm drink and a sweet treat on a chilly day? I think not! A steaming mug of coffee, a cozy cup of tea, or rich hot chocolate… they all pair perfectly with the sweetness of a caramel apple. It’s like a hug in a mug, you know?
Caramel Apples for Parties
These caramel apples are a total crowd-pleaser! Perfect for fall gatherings, Halloween parties (duh!), or even just a fun dessert for a cozy night with friends. Trust me, they’ll be gone in a flash!
Storing Your Homemade Caramel Apples
Okay, so you’ve somehow managed *not* to eat all your caramel apples in one sitting (I salute you!). Here’s how to keep ’em fresh and delicious for later:
Refrigerating Caramel Apples
Pop those beauties in the fridge! They’ll stay good for about 3-4 days, maybe even a little longer if you’re lucky. Just make sure they’re on a parchment-lined plate or in an airtight container so they don’t get all sticky and sad.
Reheating
Okay, so here’s the thing… you don’t really “reheat” caramel apples. They’re best enjoyed cold, straight from the fridge! If you try to warm them up, the caramel will just melt into a gooey mess. So, resist the urge, okay?
Frequently Asked Questions About Caramel Apples
Got questions about making perfect caramel apples? I’ve got answers! Here are a few of the most common questions I get asked, so you can avoid those caramel apple mishaps!
What are the best apples to use for caramel apples?
Okay, so this is a big one! My absolute faves are tart apples like Granny Smith or Honeycrisp. The tartness balances out the sweetness of the caramel *perfectly*. Plus, they’re nice and firm, so they hold up well to dipping. But hey, use whatever you like best!
How do I prevent the caramel from sliding off my caramel apples?
Ugh, the dreaded caramel slide! The key is to make sure those apples are bone-dry before you dip them. Seriously, dry as a bone! And after you dip ’em, pop ’em in the fridge to chill. That helps the caramel set and stick like glue. Trust me, these two things are non-negotiable!
Can I make caramel apples ahead of time?
Totally! Caramel apples are perfect for making ahead of time. Just wrap them individually in parchment paper or plastic wrap and store them in the fridge. They’ll stay fresh and delicious for a few days. So, go ahead and get a head start on your fall baking!
Nutritional Information for Caramel Apples
Okay, friends, just a quick note: the nutrition info for these caramel apples can vary *a lot* depending on the brands and toppings you use. So, this is just a general estimate, okay?
Enjoy Your Delicious Caramel Apples!
And that’s it! Go forth and enjoy your amazing caramel apples! Don’t forget to snap a pic and tag me – I wanna see your creations! And leave a comment below to let me know how they turned out!
Print
Foolproof: 6 Homemade Caramel Apples, a Sad Story
Make delicious caramel apples at home. This recipe provides simple instructions for a classic fall treat. Customize with your favorite toppings.
- Total Time: 45 minutes
- Yield: 6 servings 1x
Ingredients
- 6 medium apples
- 6 wooden sticks
- 14 ounces caramels
- 2 tablespoons milk
- Optional toppings: chopped nuts, sprinkles, chocolate chips
Instructions
- Wash and dry apples thoroughly. Insert a wooden stick into the stem end of each apple.
- Unwrap caramels and place them in a microwave-safe bowl with milk.
- Microwave on medium power in 30-second intervals, stirring in between, until melted and smooth.
- Dip each apple into the melted caramel, turning to coat completely.
- If using toppings, sprinkle them over the caramel-coated apples immediately after dipping.
- Place apples on a parchment paper-lined baking sheet and refrigerate for at least 30 minutes to allow the caramel to set.
Notes
- For easier dipping, use a tall, narrow bowl for the melted caramel.
- Ensure apples are completely dry before dipping to help the caramel adhere better.
- Store caramel apples in the refrigerator to prevent the caramel from softening.
- Prep Time: 15 minutes
- Cook Time: 10 minutes
- Category: Dessert
- Method: Microwave
- Cuisine: American
- Diet: Vegetarian
Nutrition
- Serving Size: 1 apple
- Calories: 350
- Sugar: 40g
- Sodium: 150mg
- Fat: 15g
- Saturated Fat: 10g
- Unsaturated Fat: 5g
- Trans Fat: 0g
- Carbohydrates: 55g
- Fiber: 5g
- Protein: 2g
- Cholesterol: 30mg