 Skip to content
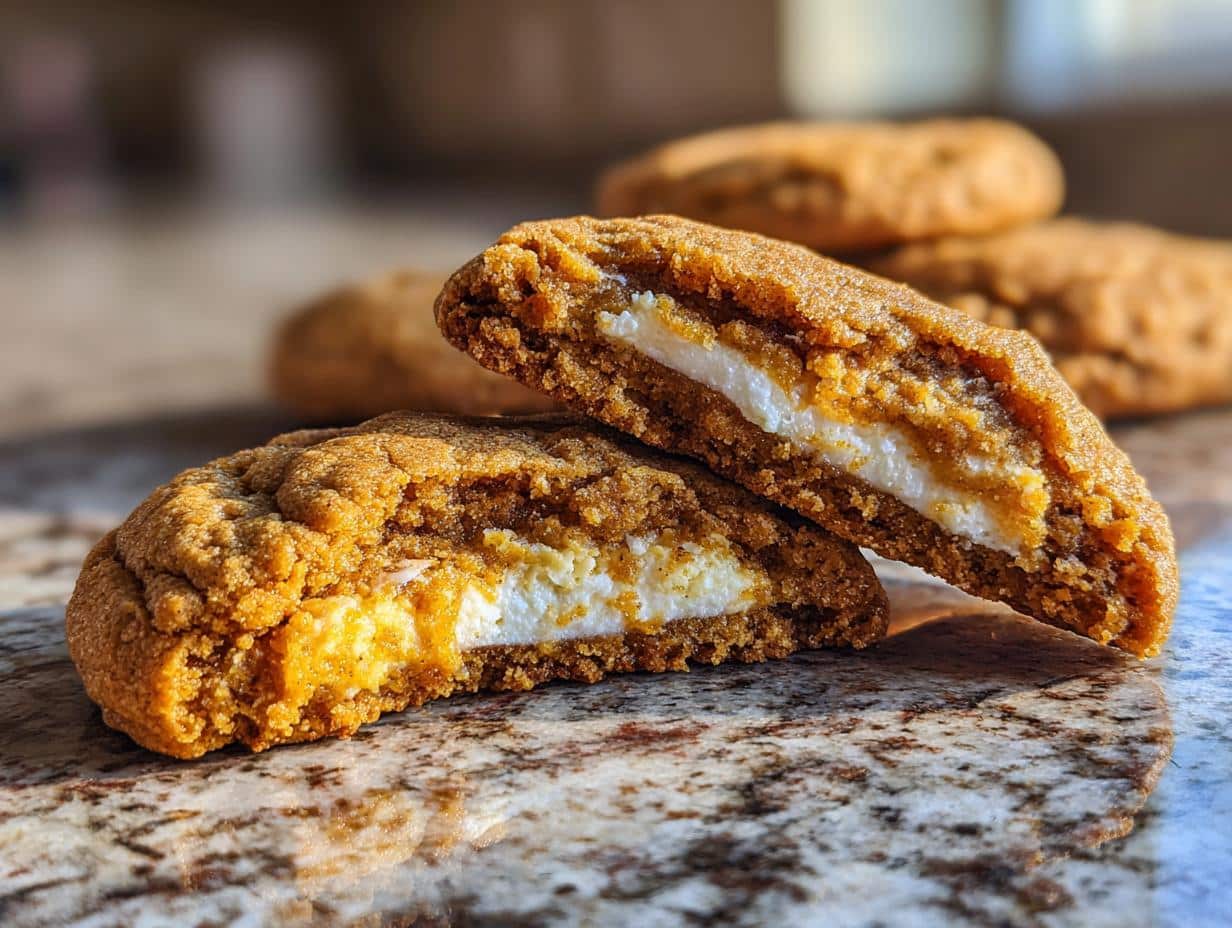
Alright, gather ’round, cookie lovers! Let me tell you, if there’s one thing that screams “fall” louder than a pumpkin spice latte, it’s gotta be these Pumpkin Cheesecake Cookies. And trust me, I know a thing or two about fall treats, being a Galway girl born and bred. Growing up, the scent of pumpkin and spice just *filled* our kitchen every autumn, thanks to my Granny Thompson’s legendary baking. Now, these aren’t *exactly* her recipe (she was more of a bread pudding kind of woman!), but I’ve taken that warm, comforting feeling and baked it right into these little beauties. So if you’re ready to dive headfirst into the season with a truly special treat, you’ve come to the right place. Get ready for the magic of Pumpkin Cheesecake Cookies!
Why You’ll Love These Pumpkin Cheesecake Cookies
The Perfect Fall Treat: Pumpkin Cheesecake Cookies
Seriously, what’s not to love? You get that cozy pumpkin spice flavor swirling together with the tangy creaminess of cheesecake. It’s like autumn in every bite! My favorite part is how the pumpkin mellows out the cheesecake, making it not *too* sweet. It’s just right, trust me.
Easy Pumpkin Cheesecake Cookies Recipe
Don’t let the “cheesecake” part scare you. This recipe is surprisingly simple, even for beginner bakers. I’ve streamlined everything so you can whip up a batch without spending all day in the kitchen. Plus, clean-up is a breeze – always a win in my book!
Delicious Pumpkin Cheesecake Cookies for Any Occasion
Whether you’re baking for a Thanksgiving gathering, a Halloween party, or just a cozy night in with a cuppa tea, these cookies are always a hit. They’re fancy enough to impress, but easy enough to make on a whim. Honestly, I make them year-round – don’t tell anyone!
Ingredients for the Best Pumpkin Cheesecake Cookies
Okay, let’s talk ingredients! This is where the magic happens, so listen up. I always say, the better the ingredients, the better the cookie. You’ll want to gather these goodies:
- For the Cookie Dough:
- 1 ½ cups all-purpose flour (I like to use unbleached, but whatever you have is grand!)
- 1 teaspoon baking soda
- ½ teaspoon ground cinnamon
- ¼ teaspoon ground nutmeg
- ¼ teaspoon ground ginger (or a pinch more if you’re feeling spicy!)
- ½ cup (1 stick) unsalted butter, softened – and I mean *softened*, not melted!
- ¾ cup packed brown sugar (light or dark, both work!)
- ½ cup granulated sugar
- 1 large egg
- 1 teaspoon vanilla extract (the *real* stuff, please!)
- 1 cup pumpkin puree (not pumpkin pie filling, mind you!)
- For the Cheesecake Filling:
- 8 ounces cream cheese, softened (again, softened is key!)
- ¼ cup granulated sugar
- ½ teaspoon vanilla extract
Now, a quick note on substitutions: If you’re out of nutmeg, a pinch of allspice will do in a pinch. And if you’re feeling adventurous, a tablespoon of molasses in the cookie dough adds a lovely depth of flavor. But honestly? Stick to the list – it’s perfect as is!
How to Make Pumpkin Cheesecake Cookies: Step-by-Step Instructions
Alright, here’s the fun part! Follow these steps, and you’ll be munching on warm, gooey Pumpkin Cheesecake Cookies in no time. Don’t worry if you don’t get it perfect on the first try – baking is all about learning and having a bit of craic!
Preparing the Pumpkin Cheesecake Cookie Dough
First things first, grab a medium bowl and whisk together the flour, baking soda, cinnamon, nutmeg, and ginger. Set that aside for now. In a large bowl (or the bowl of your stand mixer, if you’re fancy!), cream together the softened butter, brown sugar, and granulated sugar until it’s light and fluffy. This usually takes a few minutes. Beat in the egg and vanilla extract until well combined. Now, gradually add in the pumpkin puree, mixing until everything’s nice and smooth. Slowly add the dry ingredients to the wet ingredients, mixing until *just* combined. Don’t overmix! Wrap the dough in plastic wrap and chill in the refrigerator for at least 30 minutes. This is important – it helps the cookies hold their shape while baking! Trust me on this one.
Creating the Cheesecake Filling for Pumpkin Cheesecake Cookies
While the dough is chilling, let’s make that luscious cheesecake filling. In a medium bowl, beat the softened cream cheese and granulated sugar together until it’s smooth and creamy. Make sure there are no lumps! Stir in the vanilla extract. That’s it! Simple, right? Pop it in the fridge to chill while the dough finishes up.
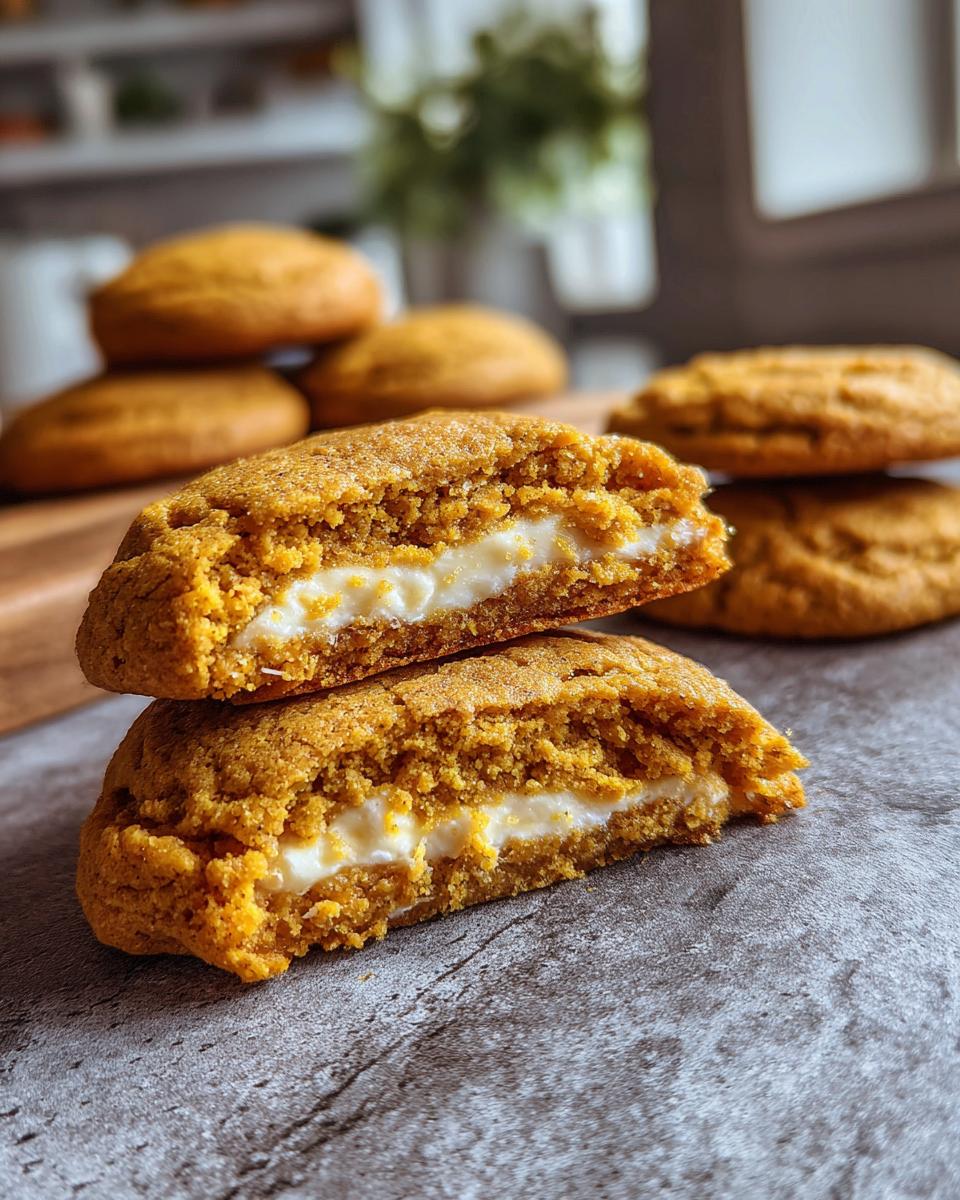
Assembling and Baking Your Pumpkin Cheesecake Cookies
Okay, preheat your oven to 350°F (175°C). Line a baking sheet with parchment paper. Now, scoop out about 1 tablespoon of cookie dough and flatten it slightly in your hand. Place about 1 teaspoon of the cheesecake filling in the center of the dough. Gently wrap the dough around the filling, sealing it completely. Roll it into a ball and place it on the prepared baking sheet. Repeat with the remaining dough and filling, leaving a little space between each cookie. Bake for 12-15 minutes, or until the edges are golden brown and the centers are set. Let the cookies cool on the baking sheet for a few minutes before transferring them to a wire rack to cool completely. And try not to eat them all at once – I know it’s tempting!
Tips for Perfect Pumpkin Cheesecake Cookies
Achieving the Ideal Texture for Pumpkin Cheesecake Cookies
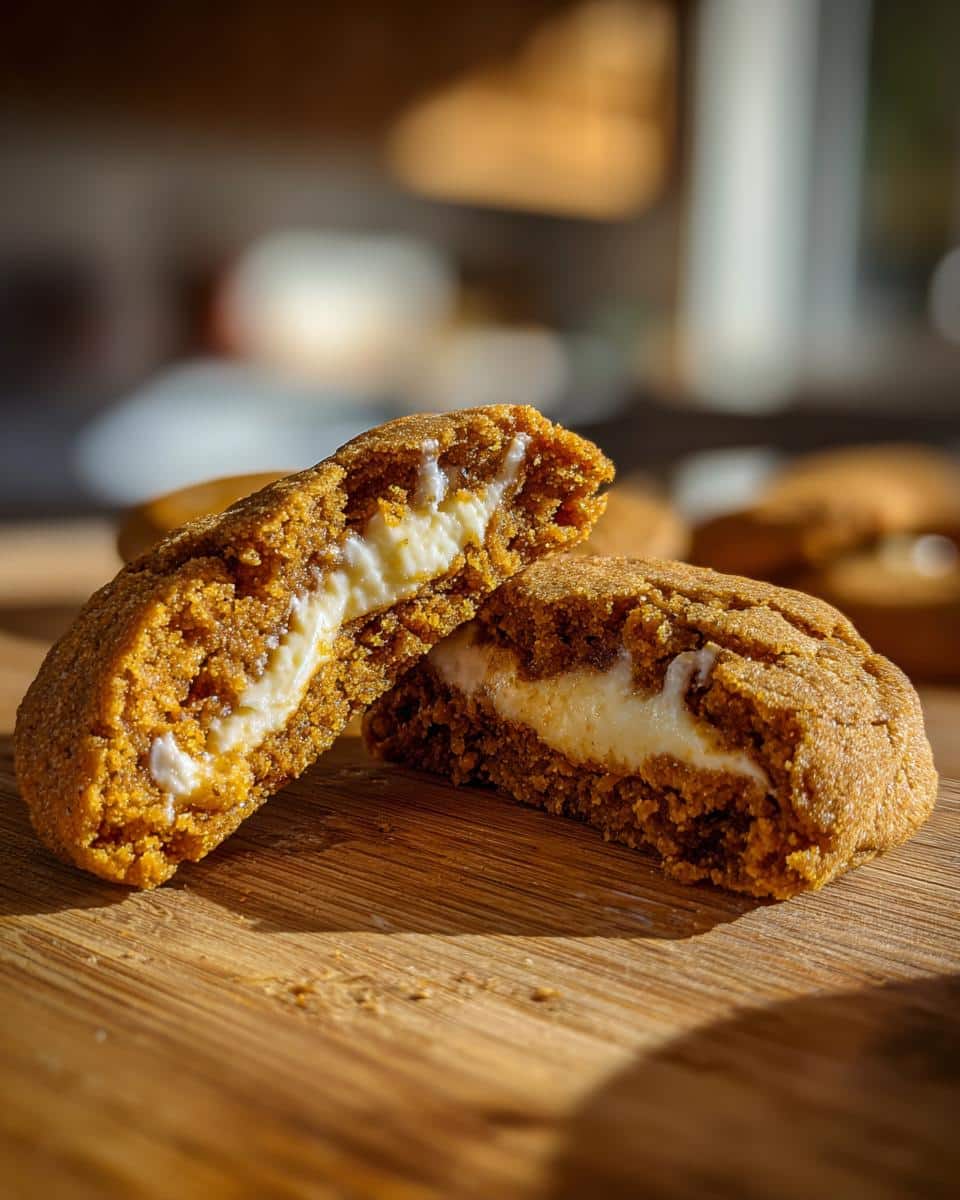
Nobody wants a dry, crumbly cookie, am I right? To avoid that, don’t overbake! Err on the side of slightly underbaked – they’ll firm up as they cool. Also, chilling the dough is *essential* for preventing them from spreading too thin. Trust me, patience is key!
Enhancing the Pumpkin Flavor in Your Pumpkin Cheesecake Cookies
Want to really amp up that pumpkin spice? Add an extra pinch of cinnamon, nutmeg, or even a tiny bit of clove to the dough. A teaspoon of pumpkin pie spice blend works wonders too! And don’t be shy with the vanilla extract – it really complements the pumpkin.
Variations on the Classic Pumpkin Cheesecake Cookies Recipe
Okay, you’ve mastered the original? Time to get a little wild! These Pumpkin Cheesecake Cookies are just *begging* for a remix. Don’t be afraid to experiment – that’s how the best recipes are born!
Gluten-Free Pumpkin Cheesecake Cookies
Got a gluten sensitivity? No problem! Just swap out the all-purpose flour for a gluten-free blend. I’ve had great luck with Bob’s Red Mill 1-to-1 Baking Flour. Just make sure it contains xanthan gum – it helps bind everything together. You won’t even notice the difference, I promise!
Adding Chocolate Chips to Pumpkin Cheesecake Cookies
Chocolate and pumpkin? Oh, go on then! Gently fold in about ½ cup of chocolate chips (milk, dark, or semi-sweet – your call!) to the cookie dough before chilling. Or, for extra decadence, drizzle melted chocolate over the cooled cookies. Now *that’s* a treat!
Storing Your Delicious Pumpkin Cheesecake Cookies
Alright, so you’ve managed *not* to eat all the cookies in one sitting? Fair play to you! To keep them fresh, store them in an airtight container at room temperature. They’ll stay lovely and soft for up to 3 days. If you live somewhere warm, popping them in the fridge is a good shout to keep that cheesecake filling happy!
FAQ About Pumpkin Cheesecake Cookies
Can I freeze Pumpkin Cheesecake Cookies?
Absolutely! If you want to get ahead, or just have too many (is that even possible?), these freeze beautifully. Just pop them in an airtight container and they’ll keep for up to a month. When you fancy one, let it thaw at room temperature for about 30 minutes. Delicious pumpkin cheesecake cookies whenever you want!
What’s the best way to prevent Pumpkin Cheesecake Cookies from cracking?
Cracking can happen, but don’t fret! It’s usually from the oven being too hot or the cookies being slightly overbaked. Make sure your oven’s at the right temp, and don’t bake them for too long. A little crack is just character, though, right? They’ll still taste amazing! These easy pumpkin cheesecake cookies are worth it either way!
Can I make Pumpkin Cheesecake Cookies ahead of time?
You sure can! The dough can be made a day or two in advance and stored in the fridge. The cheesecake filling too! Just keep them separate until you’re ready to assemble and bake. This is perfect if you’re planning a party. That way you can have fall pumpkin cheesecake cookies ready in a snap!
Estimated Nutritional Information for Pumpkin Cheesecake Cookies
Alright, so you’re wondering about the nutrition, eh? Well, keep in mind this is just an estimate, as it can vary depending on the exact ingredients you use. But roughly, one of these little beauties packs around 150 calories, 8g of fat, 18g of carbs, and 2g of protein. A tasty treat!
Ready to Bake? Rate this Pumpkin Cheesecake Cookies Recipe!
So, what are you waiting for? Give these Pumpkin Cheesecake Cookies a whirl and let me know what you think! Don’t forget to leave a comment and rate the recipe below – I love hearing from you!
Print
Pumpkin Cheesecake Cookies: A Sinful Fall Treat
A simple and delicious recipe for sweet pear preserves, perfect for canning and enjoying throughout the year. These preserves capture the natural sweetness of pears and can be used on toast, with cheese, or as a dessert topping.
- Total Time: 1 hour 35 minutes
- Yield: Approximately 4-5 pint jars 1x
Ingredients
- 4 pounds ripe pears (like Bartlett or Bosc), peeled, cored, and chopped
- 3 cups granulated sugar
- 1/4 cup lemon juice
- 1 cinnamon stick (optional)
- 2 whole cloves (optional)
Instructions
- Combine chopped pears, sugar, and lemon juice in a large pot. If using, add the cinnamon stick and cloves.
- Let the mixture sit for about 10-15 minutes to allow the sugar to draw out some of the pear juice.
- Place the pot over medium-high heat and bring to a boil, stirring occasionally.
- Reduce heat to medium-low and simmer, stirring frequently, until the preserves have thickened. This can take anywhere from 45 minutes to 1.5 hours, depending on the juiciness of the pears. Skim off any foam that rises to the surface.
- To test for doneness, place a small spoonful of preserves onto a chilled plate. If it wrinkles when pushed, it is ready.
- Remove the cinnamon stick and cloves if used.
- Ladle the hot preserves into sterilized jars, leaving about 1/4 inch headspace.
- Wipe the rims of the jars clean and secure the lids.
- Process the jars in a boiling water bath according to your canner’s instructions for your altitude, typically 10 minutes for pints.
- Let the jars cool completely on a towel-lined counter. Check that lids have sealed before storing.
Notes
- Using ripe but firm pears will yield the best texture.
- Adjust sugar to your preference, but note that sugar acts as a preservative.
- For spiced pear preserves, add a pinch of nutmeg or a piece of ginger along with the cinnamon and cloves.
- Ensure your jars and lids are properly sterilized for safe canning.
- Prep Time: 20 minutes
- Cook Time: 1 hour 15 minutes
- Category: Preserves
- Method: Stovetop Canning
- Cuisine: Irish-inspired
- Diet: Vegetarian
Nutrition
- Serving Size: 2 tablespoons
- Calories: 70
- Sugar: 17g
- Sodium: 0mg
- Fat: 0g
- Saturated Fat: 0g
- Unsaturated Fat: 0g
- Trans Fat: 0g
- Carbohydrates: 18g
- Fiber: 0.5g
- Protein: 0g
- Cholesterol: 0mg